Shed Technology: XPS & Other Tests

Hi stoneburner -

2 thumbs up!  If I’m seeing things correctly it appears that the unsealed surfaces of each perforated sample (both types of perforation) had better adhesion to the glass.  If the initial theory was that the sealer would penetrate deeper, bond to the resin, and create better adhesion, I’d have to say it’s busted.

On a recent wood strip deck inlay I did, a very simple (and cheap) method was used for surface perforation… a bunch of nails hammered through a thin piece of wood were whacked against the shaped blank several times.  So far, reports are that the deck is holding up decently. 

Bufo work on same way some years ago, ended with patented hydroflex tech. He was building pu vaccum bag epoxy stringerless in France, board buckled, skin delamed. He thought that increasing skin to foam bond will increase strengh .Not wrong.  He enrooted fiber in small holes to grip skins. He move to xps foam with this tech but he return to eps end know pu too. Seems to have a good commercial success. But no miracle build. Boards still buckled, no really more durability than others well made epoxy/foam boards.  Board break because of buckling of skin, the only way to increase buckling strengh of skin is to increase skin stiffness. When you saturate foam against skin with resin you virtually increase skin stiffness that increase buckling strengh. An other thing to look at is overall bending déformation of board, if you can reduce it you reduce buckling forces in skin, but you stiffen the boards…

sorry for my frenglish.

I like that XPS does not soak up water and it is easier/cheaper to find in my region for experimental shapes/tech.

I am not looking for a mircacle build.  I am just looking for a technique that is least likely to delaminate too easily. There have been so many inconsistent statements about XPS and different methods of glassing XPS reported at Sways.  I decided to see for myself.

These tests suggest to me that XPS perforation improves epoxy anchoring.  I can see how close, uniformly spaced peforations of the correct size could provide better anchoring, helping to minimize parallel surface movement of the fiberglass skins relative to the foam core.

Thanks John.

For this test, concrete sealer definitely interfered with epoxy-XPS bonding.  I can see how perforation would work well for wood/cork skins.

My original thought was that concrete sealer would penetrate the micro-grooves and pores created by sanding XPS better than epoxy.  I was hoping to improve bonding without the aggressive final surface sanding with 40-60 grit sandpaper.  To disprove this definitively, I still need to compare sanded-sealed with sanded-unsealed.  At the moment, I am more interested in playing with perforation. Maybe modify the CR a bit too.

I almost trashed this test panel.  First, because my skills with the CR created uneven perforation depth and required a double perforation pass to get deeper holes.  I did not want that much perforation.  Second, as I was sealing the already perforated foam before lamination, I realized that filling the perforations with sealer was going to prevent epoxy from entering those perforations.  I had/have to believe epoxy makes stronger anchors than polycrylic sealer.  I am glad I did not bail, learned alot.

The better comparison would be: sand and then seal before perforating vs. sanded, perforated and unsealed.  Until I have tried this, I am not willing to discard concrete sealer altogether.

I am thinking final XPS surface prep with say 100-grit sanding and perforation might be a better compromise than using 40-60 grit sanding for final prep.  The asthetics of the CR without veneer are not great.  I think I can tolerate the look of the WR perforations on a personal board.  There is always opaque pigment

EDIT:  The original phrasing of this statement was wrong, now revised:

“The better comparison would be: sand and then seal before perforating vs. sanded, perforated and unsealed.”


And put it in the sun. Theres a lot of trapped residual blowing agent inherent in XPS; are you trying to off gas through surface perforations as well?

It seems like off-gassing is inconsistent with closed cells.  The only cells ruptured by sanding are a very thin layer at the XPS surface.

But the Woodpecker roller was designed to prevent bubble formation under thin skins when applying them to balsa and/or foam model/RC airplanes.  I am not sure I grasp the reasoning or mechanism but, they perforate the balsa/foam before applying the thin skins. 

Better tooth in adhesion, but more wt. and glue.

How much does a piece of xps foam expand if painted black and solarized? and contract if put in the freezer? @ 10,000 elev. ?

This comment is consistent with what Kayu has said previously.

My interpretation of Kayu’s earlier comments in another thread combined with my perceptions:

I believe a pressure ding – ruptured small gas filled closed cells in the immediate surface, which also tears foam – and/or poor surface anchoring can create a small separation between foam and glass.  Expanding and contracting with heating and cooling as well as flexing cause the separation to expand into a larger delam.

Not intending to mock or disrespect.  But surfing is done at sea level.  I live and store my boards inside at 500 feet.  I would not color any board black or store it in the attic or garage rafters.

A man of great wisdom (many consider him a god!) in the boardbuilding world gave me this wee gem of information. Anybody care to comment?

“XPS is very brittle and and has the death knell of being no good for bond strength to epoxy - it contains polyethylene”

A small percentage of Polyethylene in the XPS mix was true in the mid 80s – discovered an old MSDS on-line for the Dow Blue used to build a school in the Northeast US.  I do not know how long Dow used PE in the mix/formulation.

A DOW rep sent me a MSDS for Dow Highload 40 last year.  Only SAN and styrene reported in the mix.  They would have to list polyethylene if it was there.  The O-C pink MSDS lists polystyrene at around 95% of the mix – no mention of polyehtylene.

I believe the surface energy of polyethylene is 30 vs. 33 for styrene (epoxy, 45).

I will assume polyethylene is not being used in DOW & O-C XPS based on the MSDS sheets.  Pretty sure the new XPS formulations have improved stretch/flex properties.

My $0.02 on polyehtylene**…**

_____

Record cold weather, day job and family have put the XPS laminating tests on hold for the moment.  Last Friday, 13 inches of snow shut down my little rural community.  The bright light reflecting off snow through my patio door was perfect for modifying an aquarium air pump though.

Gdaddy here at Swaylocks posted about how he converted a Whisper AP 150 aquarium air pump for suction a while back.  He uses it for vacuum bagging composite laminations.  He used the conversion method found at the following link, but for an AP 150.  Gdaddy reported he could get 10-11inches of vacuum pressure – I will assume inches of “mercury.”

http://www.instructables.com/id/Vacuum-Pump-from-Aquarium-Air-Pump/


The pump he modified had a similar internal pumping configuration as this one:

http://cdn.instructables.com/F49/J0QJ/GHFK7LR8/F49J0QJGHFK7LR8.MEDIUM.jpg


The Whisper AP 150 is a diaphragm pump made for use in deeper water, reported to work at a water depth of 96 inches.  I bought two of the new Whisper AP 150 air pumps on the internet for a good price last year.  When I opened them up for conversion, the new 150s had been re-designed (pictures below) since the older AP 150 model Gdaddy used (above).

If you have the patience for disassembly, modification and re-assembly; the Whisper AP 150 shown below can be modified for suction with minor changes.  I did it last Friday (03/06/15).  Rather than blowing air, the output jet now sucks air.  (I am assuming the newer AP 300s have the similar center plate diaphragm mounting configuration).
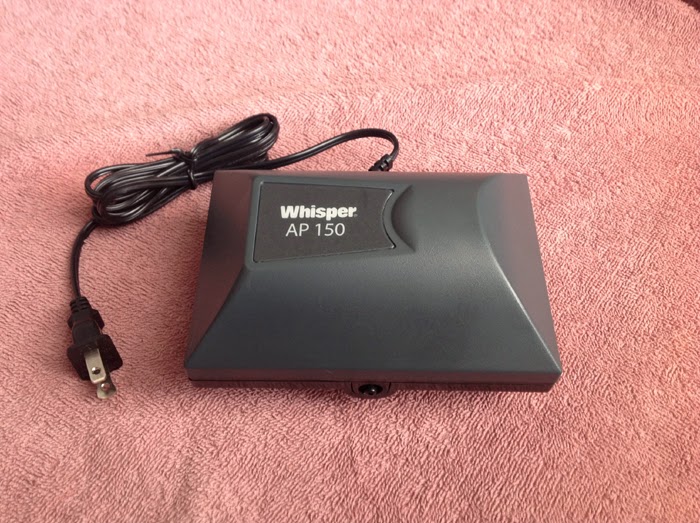
 

New Whisper AP 150 aquarium air pump
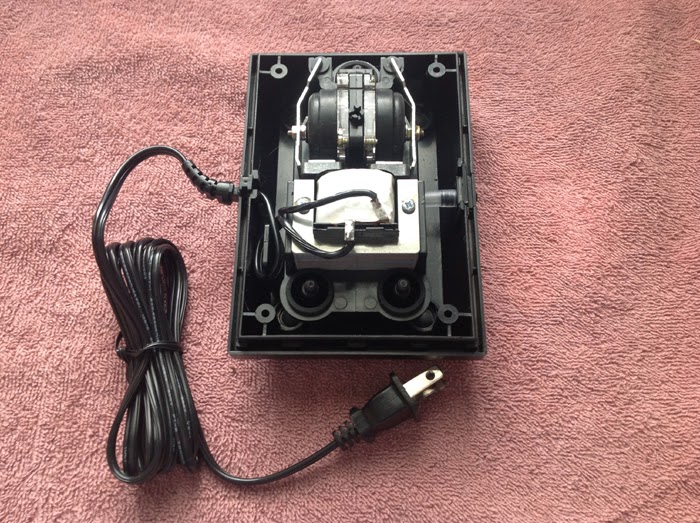
 

View of internal works – electromagnet, armatures, armature magnets and diaphragms.
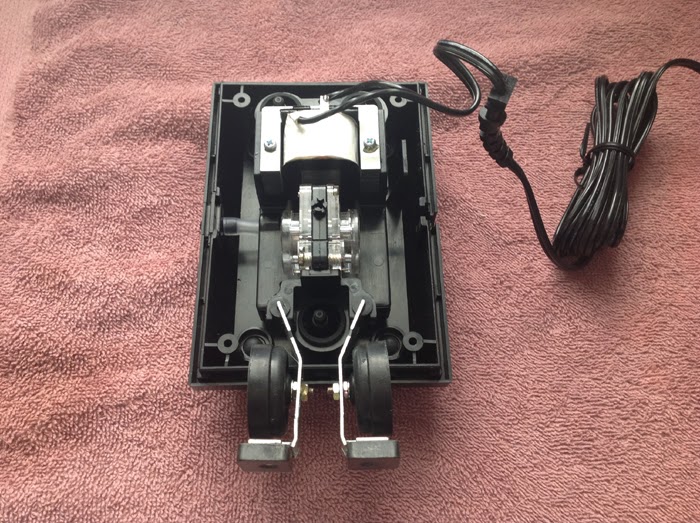
 

Armatures with magnets and diaphragms extended to expose clear plastic valve housings.


AP 150 with internal works removed from housing.
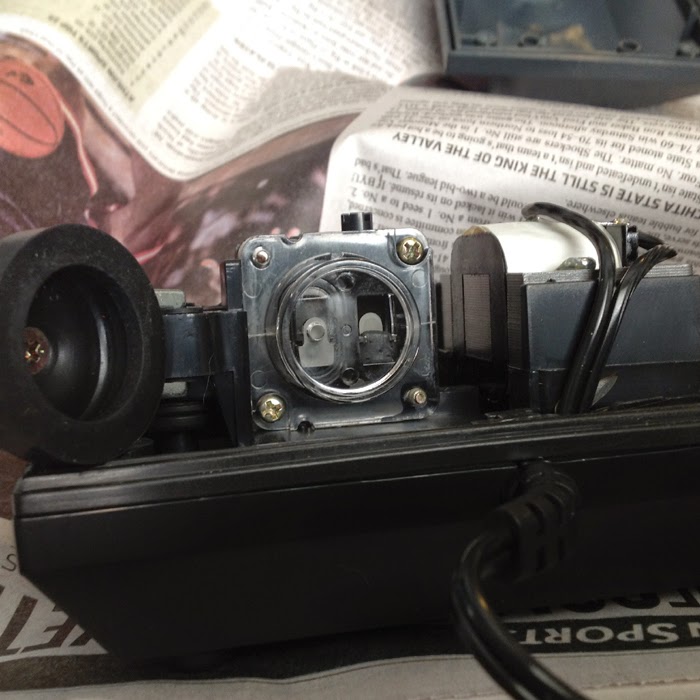
 

Close-up of clear plastic valve housing in normal position, electromagnet on the right.


Tools for modifying the pump for suction/vacuum; hacksaw blade, small file, Phillip’s head screwdriver, Q-tip and vaseline.  Vaseline makes re-installing diaphragms much easier.


Side view of internal works with clear plastic valve housing in normal position, electromagnet on the left.  Note groove over black plastic ridge at bottom right of valve housing.


Close-up of clear plastic valve housing in normal position, electromagnet on the left.  Note groove over black plastic ridge at bottom right of valve housing.  Remove screws from valve housings with Phillips head screwdriver.  Remove clear plastic valve housings and cut new grooves with hacksaw blade and small file.
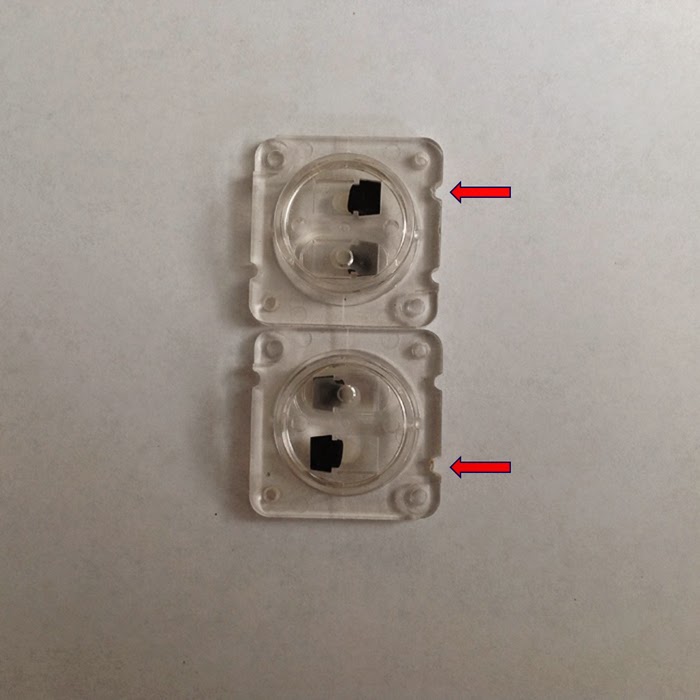
 

Modified clear plastic valve housings with new grooves (one each) to allow 180 degree rotation from normal position.


Close up of clear plastic valve housing rotated 180 degrees from normal position.  Note cut groove added is over black plastic ridge at bottom right of valve housing.  Fully visible translucent valve flapper is closest to the electromagnet.  With clear plastic valve covers each rotated 180 degrees, the Whisper AP 150 will now suck air through the nozzle where air was previously discharged for delivery to aquarium/aquatic tanks.


Below are pictures of the bottom of the AP 150 the round plastic piece is the air filter cover/retainer. The white pad is the air filter.  When functioning normally, air intake is through retainer and the filter.  But when modified for suction air is discharged through the filter and then the filter retainer.  I found that by removing the retainer and filter that air discharge from the pump housing was improved.  And as a result of reduced resistance to air discharge, I could feel an increase in suction.  I will probably increase the diameters of the 4 holes in the bottom, below where the filter was formerly placed – to reduce air discharge resistance further and hopefully improve suction a little more.

Circular air filter retainer is attached to bottom, holding the filter element in place.
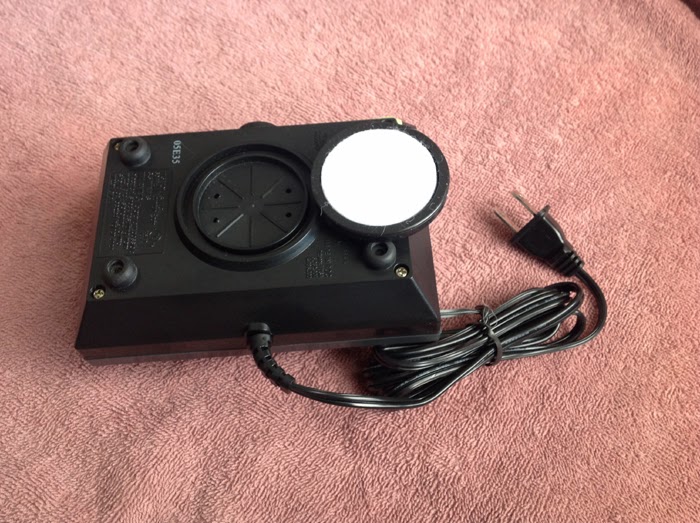
 

Air filter retainer and air filter element are removed.  The four holes in the housing bottom that facilitate air flow are visible.  Normally they are covered by the filter and retainer.  Removing the filter and retainer reduces resistance to air flow.  Since air is now being discharged through the 4 bottom holes, the air filter serves no practical purpose.  Enlarging these 4 holes will likely reduce resistance to air-flow discharge further.

Paper Fins?

A friend helped me make some 2" thick red oak planks for some outdoor storage shelves. The planks were made from discarded timber cuts found at a local lumber mill. I had to fill in some dry rot that was in one of the planks with an epoxy wood filler mix I made.

While I was at it, I decided to do a little experimenting with some (old) desk ink blotter (IB) paper I scored. Figured it might make usable substrate for fin plates when saturated with epoxy. The IB paper is very absorbent.

Four pieces of IB paper created a mini-panel (3" x 5") that is 3/32" thick. (Almost didn’t get the test piece out from between the glass panes.)

Even with the short pot life, Kwik Kick epoxy completely saturated the 4 pieces of IB paper before the resin began to set up. I would want a bit slower set time when doing more than 4 pieces of IB paper in one sitting.

Got the test piece out this morning. Seems pretty tough. Could not break it with my hands/fingers.

Need to try laying up 16 pieces of IB paper next. Might give it a FG skin/shell after foiling for greater strength.

Time to start setting up for the High Holy Days now though – Halloween & Dia De Los Muertos.