A couple of things to throw to the crowd. (epoxy)

Hey Y’all, been a while since I’ve thrown some pics up, but here they are with a couple puzzles for the problem solvers out there.

The first:

I just finished glassing a 10 foot board for small summer waves. e-glass and RR2000 over 2 pound eps. I overworked the resin a little when doing the final clear lam over the top and rails, covering the green from the bottom lam. It looked a little bit whitish, but barely noticeable. After I post cured at about 130 F I noticed that all of the little white bubbles and patches really stood out quite a bit. I don’t really mind the cosmetic issue, but wonder if anyone has had this happen before.

Sorry about the low pic quality, they were all taken from my phone camera.

The board (taken in spotty sun/shade)

Edit:Sorry about the pics, please bear with me while I try to figure this out again, photobucket seems to be giving me problems. I’ll go into the whole thing once I get my images sorted out. Thanks! -Pat

Editagain: ok, back on track.

So, here are a few pics of the whitish areas:

The next question is about this board, which was a snapped longboard that I put back together, and relaminated with RR2020 and hemp, and a sandwich balsa deck:

It was a poly board, originally an Iverson, although I don’t know what brand of foam. I initially noticed a slight amount of collapse in the foam at the tail, where there was no balsa deck. Over time (it’s been a few months) and with lots of use, the collapse of the foam was accentuated, until it looked like these two shots:

  1. Deck side up

  1. bottom up

And, a possible solution?

Thanks for any input, neither problem is actually that much of a problem, I’m just interested as to why they happened.

Pat

If you worked the resin alot you might have gotten some foaming. Also someone said high humidity sometimes makes the RR come out whiteish.

As for the stringer standing tall on the repair, I’ve had the same on a board. It was caused by a leak that caused the stringer to soak water and expand. Only cause I can see for this since you have it happening on both deck and bottom.

Don’t use a squegee, try a roller next time. I find that squegee’s make foam, the roller doesn’t.

Why the oven baked post cure? To my knowledge RR doesn’t require heat to post cure… does it?

Theory has it that ALL epoxies benefit from a post cure, some more than others

Hey Pat, the board came out great. Love the tanker tail. Any sandbar for it these days?

I agree that you probably just pushed a little too hard & fast. I find the squeegee works fine if you don’t ask it to do too much. Use it to flatten the line you pour, but don’t use it to really move resin from overwet areas to dry ones. I follow Silly’s advice & instead of pouring 2 or 3 fat stripes of resin the length of the board & working it all around, I’ll move back & forth pouring 8 or 9 thin (3/8"?) stripes and following the bucket with the squeegee in the other hand. That way, the squeegee is just widening the resin line, not moving it somewhere else. And you also don’t get pooling resin that soaks in or even floats up your cloth.

Dunno about your stringer problem - but water sounds like a prime suspect.

Quote:
I agree that you probably just pushed a little too hard & fast. I find the squeegee works fine if you don't ask it to do too much. Use it to flatten the line you pour, but don't use it to really move resin from overwet areas to dry ones. I follow Silly's advice & instead of pouring 2 or 3 fat stripes of resin the length of the board & working it all around, I'll move back & forth pouring 8 or 9 thin (3/8"?) stripes and following the bucket with the squeegee in the other hand. That way, the squeegee is just widening the resin line, not moving it somewhere else. And you also don't get pooling resin that soaks in or even floats up your cloth.

I was trying to control the amounts of resin I used and also avoid squeezing resin with the squeegee…and ended up having to mix more resin, which is always a semi panic situation. Let’s say you pour out all the resin and spread as you say but have dry spots, what do you do? Try to sqeeze some over or mix more?

You’ll notice it’s more apparent where your laps are, those areas where you tend to over work the resin.

Lap wet out issue?..did you run the laps a bit dry and then try to wet them out with a pull from the squeegee…pulling from the top to the under lap? It tend to amplify where multiple layers of glass lay. You can’t do it like poly, that’s why Epoxy swirls are always lacking POP!

Best way is just as stated above. Try to wet out the board during the pour. The less moving the resin around the better, and by all means don’t try to move the resin from tip to tail like a poly board. If you do this you will certainly get more blush / bubbles in the nose and tail.

When you wet out the laps, I pull the lap away from the board and use my hand to wet out. Another way is to use a brush and dip it into the jar to get the epoxy on the rail lap. You got lots of time with epoxy, let it sit and saturate into the cloth, don’t push it or rush it. Just let it sit and wet out. Then when it goes clear go about the business of laminating it down & pulling the excess off. Also if you use the same bucket and put the pull off resin with clear bubble free resin then you go about rewetting some place…bingo you got instant white out tiny bubble epoxy. Keep the resins apart, hopefully you’ll only have a very little in the pull off bucket.

Anyhow thats my solution for the bubble blush…or you can do as Jim P says, “epoxys are great, as long as they are white”

-Jay

Yeah, I definitely overworked the laps for good aesthetic results. Pulling resin from the deck to the laps was exactly what I did, against all the advice posted here. Oh well, I’ll know better for next time. I just found it curious that the visual aspect became more pronounced after post-cure.

Regarding the swollen stringer on the other board, I wouldn’t doubt that. The thing is that on the bottom, it’s also really concave with respect to the rail, which has held up fine. It almost looks like it was shaped as a double concave, then a flat tail block was put on. Only it started out as a slight V. Still, I’m going to go stick it in the sun bottom up and look for bubbling to possible find a leak, since it was surfed just yesterday.

Thanks again.

Pat

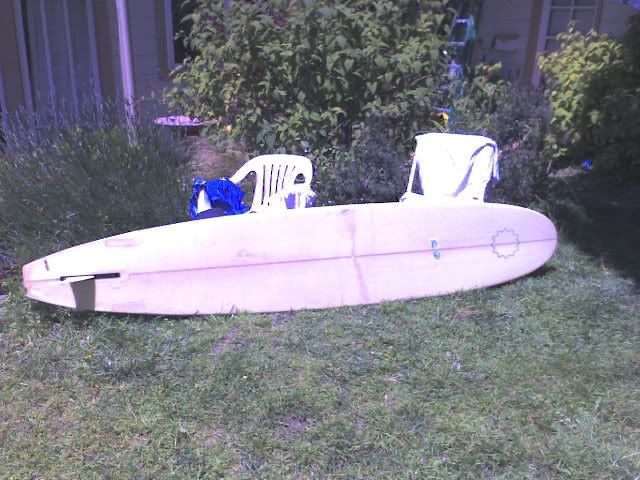
well, after heating the stringer/foam collapse board up for an hour in the sun, no bubbling or water extrusion that I could find. Doesn’t mean there isn’t a leak, though. I also let the longboard sit in the sun, bottom up, for a little bit to check for pinholes while I was at it. Didn’t find any, but when I opened the vents up, they really sprayed a cloud of air (mixed with a little water that had been around the o-ring) up at me with a big hiss. Got to do it twice - once for the vent on each side of the stringer. I wasn’t expecting that much pressure release on 2# eps, but there’s a lot of volume in that green board, so it makes sense.

now, to get a little off topic for this thread:

In the spirit of Paul’s guitar and various other bits of artwork, here’s something I came up with this spring. It’s not pretty, but uses compsand technology:

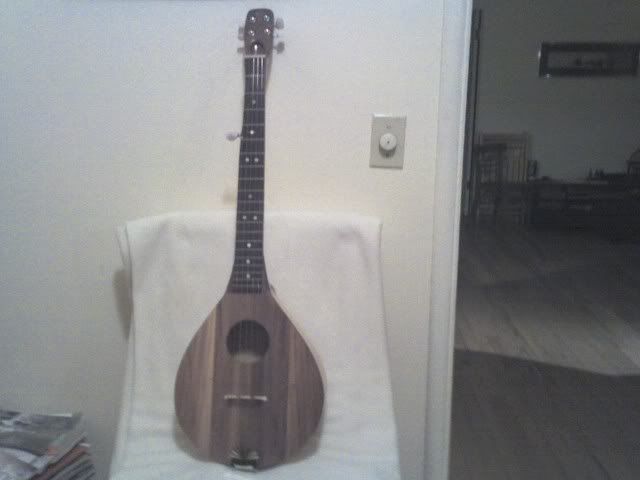
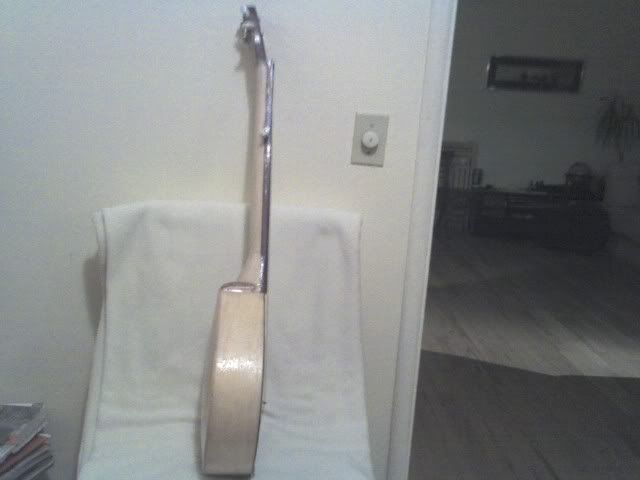
I like to call it a Lujo. (combination lute banjo)

I wanted an instrument for backpacking that would be lightweight and fairly waterproof, and I’ve been playing the banjo for a few months so it just made sense that I used surfboard tech. The body consists of five layers of 1/16" balsa bent into the teardrop shape. I initially laminated two strips of balsa together with one layer of 4.6 oz s-glass between, wet out 1:1, on a form that I made with nail in a board. The other three layers of balsa were added afterwards under 20 inches hg in the bag also with the 4.6 oz between each layer. Next, the back was fabricated over a mold (a banjo resinator covered in plastic) with two layers of 1/16 balsa with 1 layer 4.6 oz between. The back was then attached using the bag for even clamping pressure all around. Excess was trimmed to make the back match the shape. The neck/headstock was made in three pieces. First, the balsa portion of the neck was formed around a mold with the following schedule: 4 layers 4.6 oz, 1 layer 1/16 balsa, 4 layers 4.6 oz, 1 layer 1/16 balsa, 4 layers 4.6 oz. The head stock was placed inside the top portion of this piece, and is made of 2 pieces of 1/4" cedar laminated together with 2 layers glass. This proto-neck( U-shaped in cross section) was attached to the body, and the entire thing was reinforced with a layer of 4 oz e-glass on the inside. I then attached a long piece of cedar to the top open side of the neck, making it a hollow neck, D-shaped in cross section. The cedar had been laminated with 4.6 oz on both sides. Next came the soundboard: four strips of 1/8" book matched cedar, laminated only on the outside with 4.6 oz s-glass. It was tap tuned to a G, after adding supports and tone bars on the underside. The inside of the soundboard was sealed with epoxy, but not glassed since I wanted to keep the tone as bright as possible. At this point I added the fingerboard (after putting in the mother of pearl inlay dots, and with 1 layer of glass underneath), glassed the whole thing except for the fingerboard and the soundboard in another layer of 4 oz e-glass, sealed the fingerboard using epoxy, and installed the frets. I sanded it, tuned the sound hole to an A, Installed the other hardware (nut, tailpiece, tuning pegs) and played with it for about a month to get it sounding just right.

so that was just a little side project. back to surfing now.

pat

Hey Guys

When I work with poly, I flip the rail laps onto the deck and wet them out when wetting out the deck.

Once everything is wet out, I flip them down again, work the squeegy, (something you wont do with epoxy) and then lap the rails which are already wet out.

This might be a good technique to try with epoxy.

Flip the laps onto the deck, pour the epoxy wetting the deck and the rail laps, letting it soak, then flip the laps back, smooth out the deck, lap your rails and your done.

Has anyone tried this???

Cheers

Looks to me like the color (pigment) you used wasn’t stable. It looks like it may be a florecent pigment which are very unstable. This is why the heat would make the color freak out as bad as it did.

On urethane blanks, polyester or epoxy resin needs to contain UV absorber to protect the foam. This is why the blank is shrinking. RR has this available as an additive you can mix in or it can come premixed.

Quote:

Looks to me like the color (pigment) you used wasn’t stable. It looks like it may be a florecent pigment which are very unstable. This is why the heat would make the color freak out as bad as it did.

On urethane blanks, polyester or epoxy resin needs to contain UV absorber to protect the foam. This is why the blank is shrinking. RR has this available as an additive you can mix in or it can come premixed.

Thanks for chiming in Greg. The pigment I used was just standard off the shelf stuff from fiberglass hawaii, so that could be the issue. Regarding the UV absorber, that makes perfect sense. The board is stored in this very controlled environment:

Pat