Barnfield's Broken Board Repair Manual

Aloha Craftee

Sorry for the long delay. This has been a crazy winter for me. Way to busy with too many side projects etc. and not enough time in my factory.

But things are looking up and hopefully April will allow me more time to interact with you guys and get some surfboard stuff done around here.

From the “Necessity being the mother of invention” files…

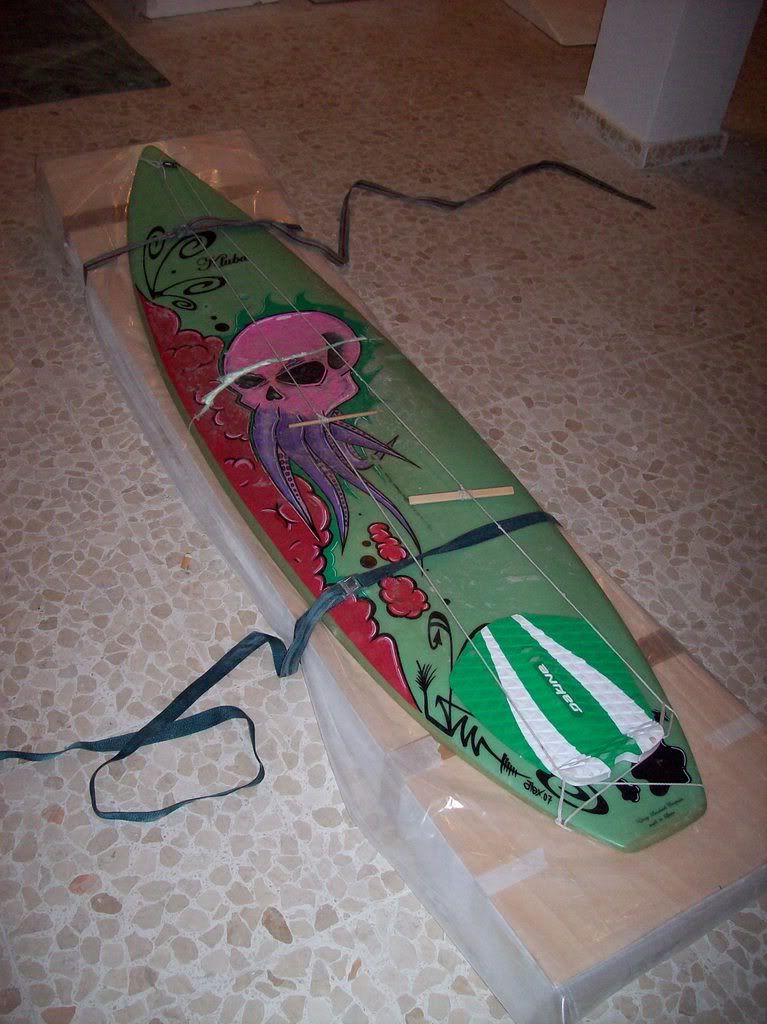
Primarily surfing places like Pipeline and Seaside Point (huge rocks, big waves, close to the beach) will take a huge toll on ones personal quiver! Consequentially, I have personaily repaired dozens of broken boards over the years, most of them my own!

When I had ProGlass running, in addition to glassing about 100 boards per week, we also did ding repairs. I had a room set up specifically for doing only ding repairs. At one point I had 3 ding repairmen working.

In my building, I have a large 20’ x 20’ receiving area with a large sliding door. The pile of broken boards that were continuously dumped in this area was about 3-4 feet deep and 10’ in diameter. We finally had to start taping the halves together because it became too hard to quickly figure out which noses went with which tails because so many boards are so similar.

I can’t even begin to guess at how many broken boards I have fixed or overseen the repair of. Surely hundreds, maybe thousands.

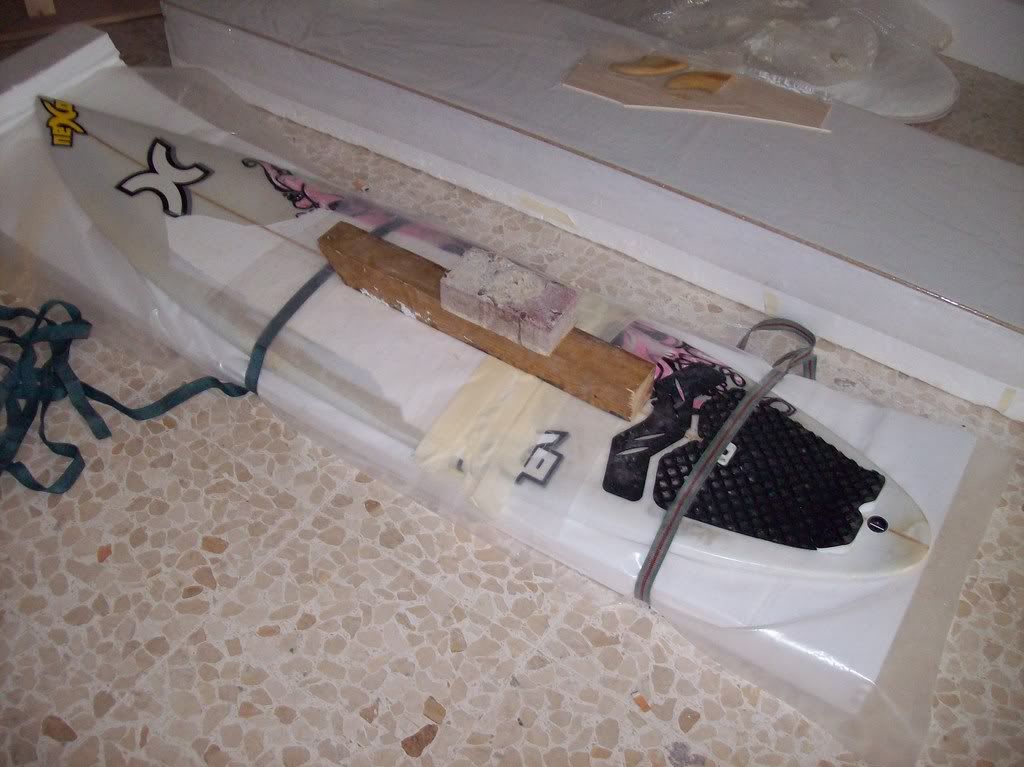
The first thing that I will get to when I begin working on that board again will be my “rocker adjusting technique”.

As to stringers… they are not very consequential to the strength of the finished repair. It is all about how you lay up the glass on each side. I will eventuall get back to finishing that sample board so you can see how I do it. If done right the board will never break at the same place again, even in spite of the stringer not being overlapped, fused or rejoined in some way. It just isn’t an issue really.

The stresses, as you know, are almost exclusively distributed through the “shell” in a composite structure. The stringer is primarly there to keep the 2 sides of the shell separated. Traditional stringers are highly overrated and missunderstood by most. Most think of them like they would a floor joist or rafter. Rather than a filler for the space between the sides of the shell.

Stringers are, of course, also there to retain the rocker when shaping. And while that is a big help, blanks will still sag, twist and otherwise move around so you can’t count on any absolutes. You have to keep checking at all steps if you want precise outcomes.

Hope this helps, more soon…

Just wondering what the “rocker adjusting technique” is?

good day mr. bill, i did this after one of those nice floaters where the wave just disappaered. the repair has been done with 37kg/qm pu and some q cell just to fill the voids. here the tape would not hold the expending glue so i used spanish wrinches what should also work fine for rocker fine tuning. the weight gaine was about 50g (1 1/2oz?) but with some more glas over and under the dcell.

salu2

uzzi

shaping since 2007

Subject Edit: Barnfield’s Half-Done Broken Board Repair Manual

good day mr. bill, the att. fotos show the last entry. their is a lot of glas missing but i wanna use it as a learning vehicel. would you please be so kind and explain the rocker fine tuning.

salu2

uzzi

plastic everywhere and glued with pu exp. foam.

Sorry for being so long out of touch on this thread. I will get back to it eventually.

In the meantime… my “secret” rocker adjusting technique is really quite simple and quick.

After the board is glued back together and the crack/gap is filled with Microballoons or Q-cell and the rocker is a little off, as in too much or too little, just get out your circular saw and cut a kerf through the filled crack! But, only cut it as deep as you need it to free up the rocker. Probably about 3/4 of the total thickness. You just don’t want there to be much spring back or tension to cope with, so cut deep enough to relax the board so you don’t have to struggle to set the correct rocker and hold it there. Also battery tools often have a thinner blade so the kerf will be narrower but it really doesn’t matter much as you will be taking out and replacing mostly Q-Cell and very little original foam. But if the rocker is way off, you might need a wider kerf or a couple of them depending on which side you cut on and which way you need to bend the rocker.

Now using tape, LENGTHWISE, down the center of the deck or bottom you can pull the rocker either way till you get the exact arc you are looking for. Then fill the kerf with Microballoons. It doesn’t matter too much which side you cut the kerf on, but sometimes one side will be more logical for various reasons. Just keep in mind that you have to fill the kerf and that side of the board will need to be facing upwards to do so easily. So cut the side that will make the most sense and your task easier and the finished board look best.

The strength will be in the glass so don’t worry about this making the board weaker. Using this system you can fine tune any rocker to perfection even if the original break is a mess.

You can also take out twist this way too. Only you would cut in from the rails leaving a small flexible area in the center to hold things together slightly while you tweaked the rails up or down on each side to remove the twist.

You can’t fix misalignments side to side or top to bottom. For those you need to cut the board totally in half again and reset the pieces. This system will only work for rocker and twist. It will be to fussy to cut 99% through the board and try to flex out these errors. It is easier to just fully cut and reset the board.

Hope that helps. Don’t forget… it is a “SECRET” method so don’t tell anyone else! [;)]

thank you sir, i actually had to break this one as tha straps where to far apart and the hole thing misaligned due to the exp. foam. the 2. time i strapped the wood piece in and close to the break.

those rocker cut offs are pretty nice to work with, it is flexible and for setting you can use shims so its very close and no add. cut needed.

thank you

salu2

uzzi

of currse i won’t tell anybody bsssssshhhhhh

WHAT?!?!!!  Ha!!!

Did this board ever get “finished?”

Just checking - I think there’s enough to get me started, but I would love to know about Bill’s glassing method.

whew!! that took some detours…hee , hee…its so unselfish of someone to take the time to put out a response like that…mahalo…the lazarus jig peeked my intrest, have always taped the tail of the broken board to a nice ladder back chair,. that way i can stand right up on my work, when setting the nose. the rocker is the tricky part, some go together some dont. so learning of the saw method was great news!!i i to would be interested in his glassing technique,i was taught a butterflypatch followed by 2 diamond patches, making sure the rails get wraped in all patches. the butterfly being the first followed by a bigger diamond still followed by yet a final and bigger diamond, this on both sides of the board…


[quote] WHAT?!?!!!  Ha!!!

Did this board ever get "finished?" [/quote]


Ha Ha, that’s funny!  I guess I deserve it though…

The board has never gotten done yet.  That and many other projects, took a back seat to the all the crap I have had to take care of over the last couple of years.  Things are shaping up though and I may get to it in the spring.

This is the current monster I am trying to get off my “To Do List”!.. It’s a long story, with pictures![img_assist|nid=1047187|title=Yacht Deck Sanded|desc=|link=none|align=left|width=480|height=640]

Hey Bill - Thanks for postin’.  I’m pretty sure this thread was pre-“heart” event, was it not? 

Is there any chance you could write up your glassing technique?

My thoughts would be similar to Isrmaui’s, but  not sure.

Any one else out there have tried and true glassing techniques for once you have the pieces back together?

Thanks -

YO TAYLOR ..I LEARNED THIS TECHNIQUE FROM RICHARD ANDERSON, OF OCEANSIDE CA. FORMLY OWNER OF REDSURF, IN o"SIDE..........IT WAS A  BUTTERFLY  WING WITH THE WINGS WRAPING THE RAILS....... FOLLOWED BY 2 DIAMONDS.......THE DIAMONDS  WERE QUITE LARGE AND ALLOWED YOU TO BLEND  IN WHEN SANDING, RICHARD USED THIS TECHNIQUE ALL THE TIME DURING MY EMPLOYMENT WITH REDSURF...WE NEVER HAD ANY PROBLEMS..BUT IM SURE THERE ARE MORE THAN ONE WAY TO I DO    THIS.... I KNOW THAT THE THEORY BEHIND THE DIAMONDS  IS NOT TO CREATE A STRAIGHT LINE ACCORDING TO HIM THIS GAVE THE REPAIR SOME MUCH NEEDED LONGITUDINAL STRENTGH....HASTA

Thanks LSRMaui - Makes good sence.  I suppose if I dont’ hear anything more, I’ll give it a go. 

Mahalo nui loa!

i’ve got a broken board that i’m going to attempt fixing. i went back through this thread and figured someone else might find it useful. so, to the tune of “shave and a haircut”…

bump ba da bump bump

bump bump