Casting hybrid lamination fins

Ok Surffoils, I found a suitable container:

And I bought some more silicone for the next run, a different type, not transparent. I bought it from a guy who turned out to have been doing casting for a long time, and he makes vacuum de-gassers for sale. I will be able to rent one off him for a weekend if I ever need one.

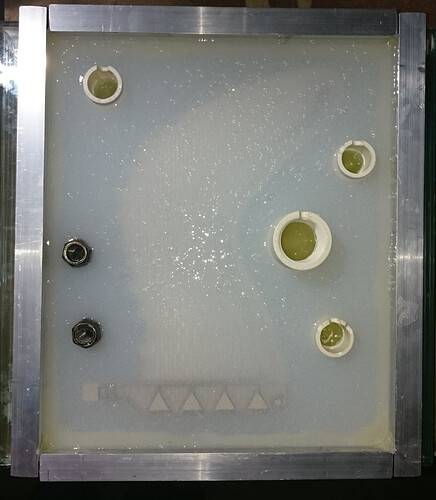
The first half-mould came out good!

The aluminium pipes and the PoP and modelling clay came off the glass and the silicone, while the fin remained attached to the silicone.

One problem I found with those pressure-pipe connectors: They are not straight cylinders. Two halves have been melted together with poor tolerance, almost 1mm out by rule of thumb. That means they will ‘key’ the two mould halves crooket unless they are inserted in the same place and in the same rotation as they were when the second half of the mould was poured. I have therefore cut some markers out of the top edge of each one. If I can remember where to put them, it should be fine. Deepest groove points ‘North’ to the side of the fin tip.


The silicone seems to soak up petroleum jelly. An hours or so after the first application, it was all gone and it did not feel greasy at all any longer. Not sure if that would have caused the second mould to bond to the first, but I applied another petroleum jelly coat just before pouring the second mould.

I improved the vibration table a bit, but it’s not really needed anyway.


Looking very good Mr Mik.

Sorry I dropped in on your thread, I’ll wait and see if I can offer any advice later.

No worries, Surffoils, please keep it coming.

The silicone approach is quite expensive and only worth it if there are additional benefits, other than just getting a fin that you might as well buy for $100.- or even $250.- .

I can not buy another one of the Gullwhale fins, they are not being made any longer, and it has a more complicated shape than most fins, so it is a good example for accepting all this extra work and cost. If the method I am developing works with this fin, it will work with most fins, and I end up with a fin that I can surf and cannot get any other way.

Where your advice about casting in plaster or concrete comes in handy is here: I want to make rough plaster casts of the gullwing fin, and then refine the shape by hand. I already have the perfect template: The marine ply / carbon / Kevlar laminate I made a week ago is large enough to encapsulate both the straight tip gullwing fin and the standard gullwing fin. It is the one shown above in the cheap plastic container I bought yesterday after your comments about casting. I was waiting for the next installments and kept checking swaylocks on my phone while I was out shopping, in case I need something else.

So I bought some more PoP yesterday and the large enough plastic box, in order to allow easier and frequent casting of temporary moulds. I’ll make a cast of the laminated outline, then cast it in plaster.  Next I’ll refine it’s shape, e.g. shape the fin box tab more closely to what I need, and then make another mould of the better shape. Backups so to say, they need to be easy and quick and cheap. And I’ll want to try to recycle the PoP in the process somewhere, although it may not be cost-effective.

So eventually I’ll end up with a mould for a straight-tip Gullwhale fin, without producing much toxic dust. If I mess up a bit and cut a chunk out of a template, I can fill it with moulding clay. If I drop an entire cast and it shatters, I can go back one step to the latest set of plaster moulds and remake it.

Your idea to use concrete was great, too. Now I think I’ll make a concrete fin tab with steel rods in it, for hybrid concrete/PoP moulds: A tough tab + fin core that does not need to be re-shaped each time, with a soft PoP fin cast on top of it, ready for easy shaping by hand.

If you’re making rough shapes to refine why not make a ply outline of the fin without the foil or bumps and then cast that ? 

I gently poured the mix into a restaurant take-away container, and build it up in the centre so the fin will sit on a plateau.

Lay the fin on the wet mix and wriggle it down into the mix until it is just over 1/2 submerged.  

You can see that it is an exothermic reaction but after about 2 hours it cools down.

Surffoils: See last photo on page 2 for the ply outline in the newly aquired box. Exactly what I had in mind, but meanwhile I’ve come up with a few other ideas. Not enough time to try them all out at once…

The first cast went quite well I think, except for the fact that the separation line betwen the two halves is not horizontal. Despite of my best efforts, I put about 1mm fall into the PoP, dropping away from the fin. So the first half of the mould has the fin impression lower than the edges of the mould, and the second half has the fin area higher than the rest. I think it will still work out well.

Minimal bubbles, just one or two, see picture. If you zoom in on the area where the pick points, you can see a bubble, and also what very fine detail of the surface structure is reproduced in the mould.


Surffoils, how do you do the other side of the fin? Or is that method only useful for fins with one flat side?

Regarding refining the shape, I think I might start with a good, but small and thin fin, with a very nice fit in the fin box.

Then, make a PoP mould and re-cast the fin using PoP+portland cement. That should give me a ‘concrete’ fin with well fitting fin tab. Then, add layers of PoP to the surface, without covering the fin tab.

I will then have a fin template with excess PoP on the outside, but with a tough core. I can shape the PoP until I like it, then make the next mould. The fin coming out of that one should have a perfect tab and the fin shape I made by hand.

To aid foiling, I could also apply layers of PoP with a bit of pigment added, to create contour lines. Endless possibilities.

Yours is looking good Mr Mik !!

When the Mold has cooled tap the fin from the deepest part of the Mold (which is the tabs) to release it.

The surface around the fin is rough but that doesn’t matter because this is only one half of the Mold.

The fin is set in the centre and on a sight rise so you can flatten a small collar around the cavity.

If you take a chip out of the Mold it only means there will be a chip of extra resin to sand off so it’s no big deal. Just make sure the surface inside the cavity is smooth and free of any debris, if there’s a bubble just fill it with a bit of wax.


You lost me somewhere back there, but no matter, I’m loving this thread!  Pics and all, it’s awesome.  Thanx both you guys for taking the time to share.

As long as the fin is set 1/2 way deep, you’re on target.

Now draw a line 1/4 inch away from the edge of the cavity.

You’re keeping the 1/4 inch flat rim to provide strength to the edge of the cavity when it’s time to cast it in fibreglass.

Now sand / grind the rest of the top down. A steeper angle is better.


I gave your method a go but made a humungous mess of it.

I guesstimated that a Pop / Portlant cement / water mix has about a density of 1.333, so to make 1.5L of casting materials I would need to weigh 2kg of ingredients.

I further figured that 3 parts Pop + 1 part cement + 4*0.7 = 2.8 parts of water would make a good mix.

So far, I still think that is about right.

What I got wrong is how fast the stuff sets. It took less than 5 minutes to be unworkable at 16degC ambient temperature, ingredients about the same temp at the start. I read somewhere that the more you mix Pop, the faster it sets. Seems to be true.

By the time I was pouring the mix into the form, it sat there like a dog turd, without running flat.

I spread it out with a scraper and wiggled the form around but it was too late to get a flat surface. I pushed the fin in anyway, but the surface was so uneven that it was too deeply embedded in many places.

I could hardly push the key objects through the stuff a few seconds later.

Then I managed to crack the mould while taking the metal bars off around it so I could scrape better on the superfluous material on top.

At least I got the fin back out unharmed!

Lessons learned: None really, but certainly some ideas for the next time I try this:

  1. Sieve cement, and mix cement into water first, and/or maybe use electrical mixer to stir it thoroughly and for a long time, until smooth. Get a good flour sieve.

  2. Add Pop to the mix and stir it for maximum 2 minutes, then pour into mould container.

  3. Add in PVC pipe tubes as key objects one at a time, with 30s or so between insertions. When it gets the slightest bit harder to push them to the bottom, then put the fin on top and push it in to the halfway line. That way, I hope it will not sink in too deeply.

 I think that’s a classic learning curve. It’s only taken me 40 years to get it right. The official instructions are for making building cement or PoP sculpting but you’re not making that.  Stick with PoP, it’s easier for a new guy.

Just try it again using a small fin so you use less material. Mixing is a gentle affair, use a touch more water to give you more time.

It’s about the look, the feel, sensing it’s right or wrong. Even now I throw 1/2 a mix out occasionally because I know it’s going ‘pear shaped’ and it’s easier to start again than punish yourself trying to make it come good.  For my apprenticeship the engineers made wax models and I made dozens of PoP mixes every day to cast those models. It was hell,  and eventually I could do it in my sleep.

You only need to get it right twice to make a great fin and you’ve done a great job so far.


Surffoils, that’s true, I don’t need cement in the Pop for the mould.

But I think I will eventually need a Pop + cement mix, for a fin core that can be held in a vice for shaping, without damage to the fin tab, possibly over a number of cycles.

And the more mistakes you make, the faster you learn (within certain limits, like not exceeding one’s frustration tolerance or financial means).

Other lessons learned out of the messed up attempt:

  1. Don’t start late under time pressure;

  2. Do it in day light, so you can measure and mix outside without worrying about the dust;

  3. Clear the work bench before starting, it can get messy.

  4. Consider puting some coarse cloth in the bottom of the mould, to hold it together, or add fibres, particularly if the mould is for ‘archiving’.

Regarding the technique you are showing, I guess the downward slant of the edges will have the function of ‘keying’ with the top part of the mould? Or do you shape it the same way as the bottom?

Mr Mik, yes that’s the next step, to pour a top section so then there’s a double foiled void in the middle. The slanted sides allow the resin to run off without adding air.

All your points are good.

That’s brilliant! Not only ‘keying’, but also guiding excess resin away. Much better than my failed attempt to create a level interface.

Getting it level on both sides is hard, if you’re off by 1 mm then it’s hard to reverse.

So it’s easier to slope the sides around the void,  you get a complete ‘key’ around the fin that automatically fits together with the top and bottom half.

The more angle of the slope the sharper it keys and it’s better / quicker / easier than digging grooves. That’s why you need an inch surrounding the fin when you pour it up.

Then lay up in both halves, put them together and then compress. If you’ve done it carefully there’s no bubbles. I put it in a bag and vac excess resin out of the Mold so it’s not a heavy resin saturated fin. But I’ll show all this as we go along.

This just keeps getting better! I finally found the time and motivation to search a bit until I found the name of those parts used to make snap-in fins.

Now I have some on order and will be making snap-in gullwing fins before too long. Unfortunately the snap-in gullwing fins are not being made any longer, the factory in Japan got destroyed in the tsunami a few years ago. And my original was lost in the surf (after 4 years of using it a lot).

“Spring Plungers” is what they are called, and many other names, like “Ball Plungers”.

I have these on order, hope they are just right for the job: http://au.rs-online.com/web/p/ball-spring-plungers/0478567/


Mr Mik, that’s good information to know,

I’m now wondering what I could build with those things …???

But here’s the next bit about casting fins. After you’ve got the plaster Mold trimmed, cleaned and even take out a thin layer of plaster at the fins thinnest points ( leading and trailing edge) because it’s better to have it a fraction thicker coming out of the Mold.

If its exactly the fin shape coming out of the Mold, when you polish it it will be too thin. 

Now wax the Mold so it doesn’t stick to the other half or the resin, and wax it good. I’f it sticks you’re screwed and you’ll have to destroy the Mold that you so lovingly created, so wax it good. Wax the cavity, the rim, the slopes and the sides but not the bottom of the Mold…

On this one I’ve done about 12 coats, rub it in so it’s warm and absorbs into the plaster and the plaster will absorb quite a bit so do,it again. I do,one coat and then leave it for an hour and do another. If you’re going to use the Mold more than once, wax it many times before you use it. .

I’m using a quality car wax with Carnauba wax in it.

I had another crack at making a Pop + cement mould.

I’m using a lot of hot glue and might be able to recycle it if I could melt all the leftovers back into the right shape. That mould would be used many times over the years if it works well, so it’s worth making it tougher than standard Pop.

I used the same 3 parts Pop + 1 part cement + 2.8 parts water mix as last time, but I sifted the cement with a flour sifter into the water, stirred it, then sifted the Pop into the mix without stirring. Then, a quick 2 min mix and pour.

By the time I was placing the hot glue sticks into the Pop / cement, it was almost too late again, but I managed to finish it just in time. 

I have since then improved the sifter a lot (bending the mechanics a little and adding hot glue here and there to stop it from jamming and hurting fingers), so next time I will be able to work more quickly.

I paid closer attention to the resulting volume and so found that with this mix ratio, 1.33kg of mixture resulted in about 752ml of set material.  So the ratio is around 1.85kg / litre (not 1.33 as I guesstimated initially).

Next time (for the second part of the hot glue stick mould), I’ll use a bit more water, probably 0.8x4 = 3.2 parts instead of 2.8 parts. That should slow down the seting time and change the weight to volume ratio to about 1.6kg/litre.