fin cant

Hello there,

I am currently working on my first diy surfboard project. It’s going to be a 6’10 x 21.5 x 2"3/4 egg. All my outline has been cut out and I sanded the bottom and deck flat. Hence, I now need to work in bottom contour. Still hesitate between single to double vs flat to Vee for summer weak days.


Anyways, my question is technical. How am I supposed to make sure I will respect the 4° cant, if I install future fin boxes on a Vee bottom contour ? The flange of the fin box will always sit flat on the angled bottom, thus making an angle that will exaggerate the cant. What do I understand wrong ?


The Futures install kit should come with some EVA foam shims. Level your board as best as possible, throw your router jig on and level that as well with the shims on one side or the other depending on your bottom contours.

Now for example, say a vee bottom, the outer boxes will have the rail side part of the flange flush to the foam and the inside of the flange sunken a bit which is fine, it will be the opposite for a single concave. I use some old fins when I glue the boxes in and double check that they are straight, don’t forget with Futures the cant is set in the fin.

Unfortunately I don’t have the install kit as it is very expensive to have it delivered here in canada. I am planning to build one with the required dimensions and to test it on scrap pieces of foam …

Also, don’t have old fins. Is it possible to use the real fins that I will be surfing with ? Or should I plan to make some dummies ?

Oh ok, plenty of guys have made some sort of jig for Futures installs, it’s a little tricky with the two separate routes but it can be done. You can use whatever you have laying around for the shims, the ones with the kit are around 1/16" or so thick I believe. Yeah you can use your regular fins to help with the install, I just use old plastic ones cause I tend to get some resin on them when handling. Sometimes I use pieces of plywood I cut to fit in the boxes too. 

If you are going with Vee in the tail, you may want to consider the 4 degree cant to be based off the Vee panel, not a flat/level line across the bottom.  Another thing to look into, if the board is for mushy/weak waves, more cant can be a good thing.

Like a lot of people, I sell the Future Install Kits.  Not very often but occasionally.  Your best bet (depending on which Canadian Coast you are near) is Fiberglass Supply in Washington.  Closer to Canada so should be less cost on the shipping.  If there is another shaper in your area or near by, you may be able to pay him to rout the holes.  People hack these out all the time.  It’s not an easy thing to do.  People on this site brag about being able to do this,  but they never post any pics of what the hole looks like before the box is installed.

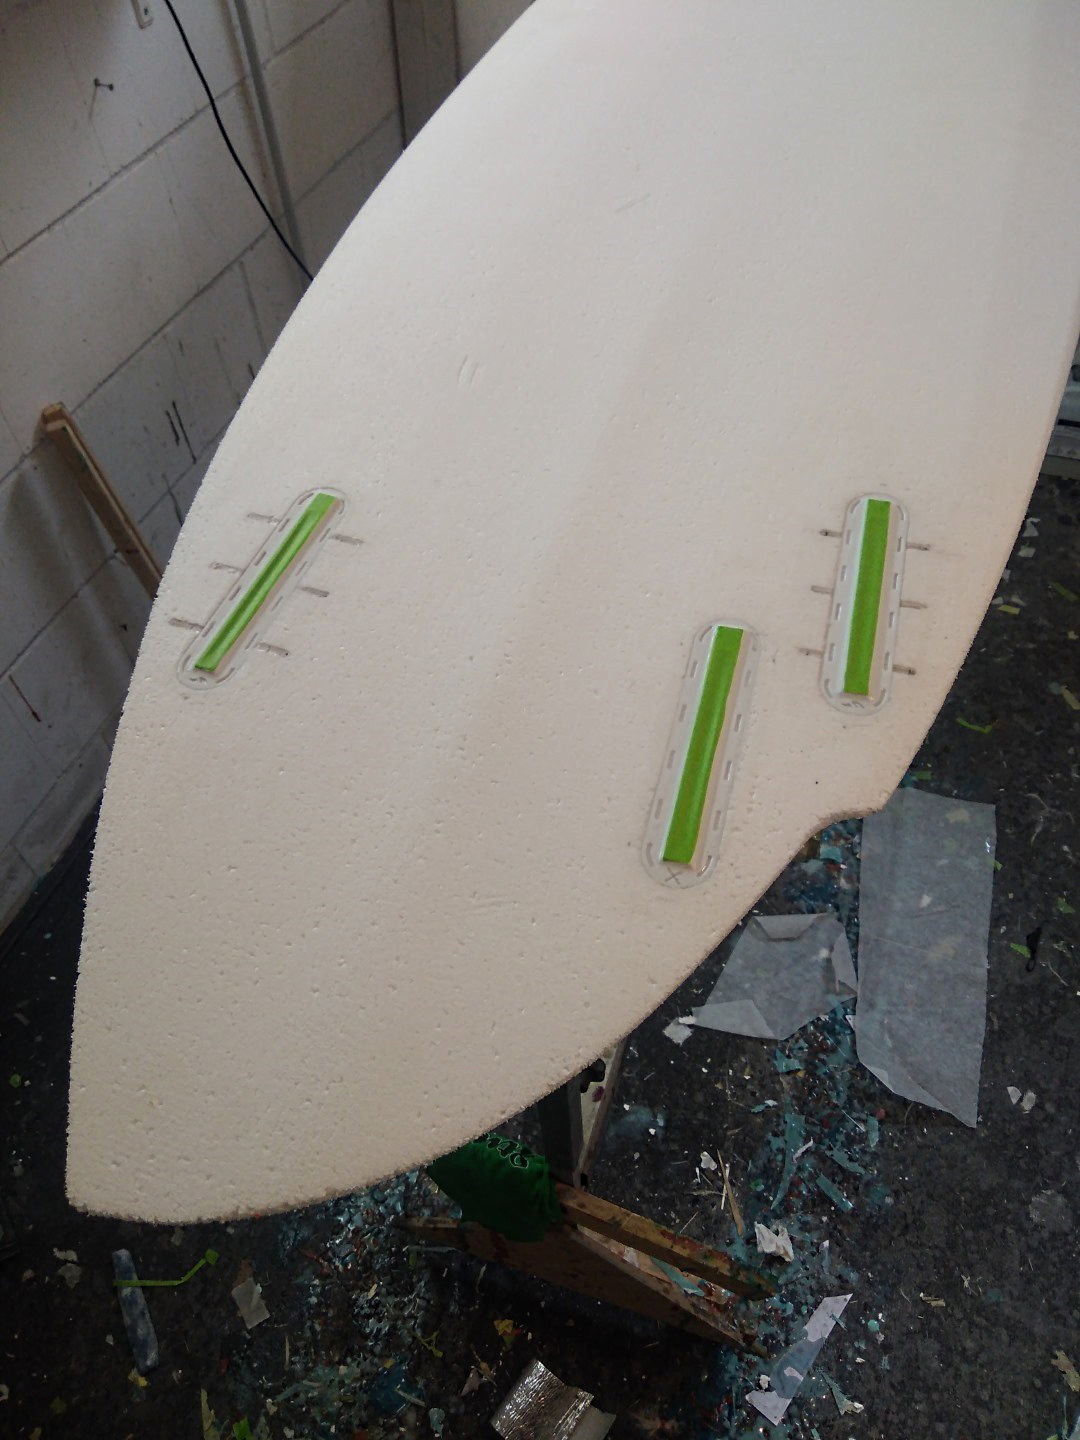
I assume we are discussing the futures boxes shown below? Not telling or suggesting what to do, just saying what I do. I freehand these with a little Bosch trim router (shown in the 2nd pic). The board shown didn’t have any extreme bottom contours.

I just marked the locations carefully with pencil, and took my time. I did the center slots fist, being careful but not stressing cuz this part doesn’t show.

Then the shallower part. First pass at half depth, staying about 1/16th inside my lines. Next pass at full depth, carefully sneaking up to the line. Just like coloring in a coloring book, take care to stay inside the lines.

A few more passes, gradually deeper, are called for when routing a stringer. Don’t try to scarf out big bites.

I have worked with hand held power tools pretty much my whole life, and do not find this difficult. I always maintain dominant control of any hand held power tool, and always try to think through what COULD happen, and act accordingly.

Not bragging, cuz I could get hurt tomorrow, stuff happens, but just saying I have never had a power tool injury in 40 years in the remodeling industry, and lots of creative home projects over the years. I do not fear power tools, but I maintain a healthy respect.

Always proceed with caution using ANY power tool, and do not attempt anything you are not comfortable and confident with.

Edited to add: thinking back, I remember now I did the stringer slot with a forstner bit on a hand held drill, just drilling my holes edge to edge for the length of the slot. I started each time with a spade bit until I got thru the fiberglass, then switched to forstner bit to finish drilling. Then cleaning up at the end with the router.


That is master work with a router .    I used to be better at it than I am now.  But age has brought on the shakes until I plane, surform or pick up a paintbrush. 

I only do one Futures board every 2-3 years, that´s why I hack my cavities out (with a router).

For sure it´s not as fast as with the original one pass kit. But it´s a snug fit on the box and the flange (I have to pull the boxes out with a fin after checking the fit).


Very well done.  Like I said people do it all the time, but we don’t often see the holes pre-fin box.  Based on the really good work that you and Huck turn out though, I wouldn’t expect anything less.  But for a first board not that easy.

The kit is for sure much safer to work with. I didn´t want to question your advice. (quite the contrary ) Sorry if my post sounded like that.

Wrong depth of the slot or the flange, or routing to wide…all that will compromise the strength of the installation.

The kit guarantees a tight fit and a strong installation.

The hacking is more difficult and takes more time when you want to do it right.

Hey MiWie, really nice work ! I see that you have shaped a Vee in the tail of that board. Did you compensate anyhow for the added cant angle ? How pronounced is your vee ? 1/8" ?

I understand that for a first board, it is not recommanded to go otherwise than with the jig. But not trying seems odd to me. Moreover, I plan to test on scrap foam. So I should get a good idea how risky this should be to do it on the real thing …

That board had a very shallow combination of vee + double concave flowing together. It looks exaggerated in the pictures. I checked the router alignment with a square and a straight over the bottom in the middle of the board (that’s always my “zero” reference). Like in the picture below, where I checked the finbox. 

All I remember is, that I thought a lot about sinking the flange to compensate bottom angles before I built the board and before routing. But the kind of spiral vee resulted in an almost “zero” positioning where the futures boxes sat. I only shimmed the router jig a tiny bit. I think with a drywall grit. You couldn’t see the minimal tilting on the flanges of the futures boxes later on. It was close to zero. 

No offense meant or taken.  If anybody has the ability to free hand a two depth route in foam it would be someone with ability like you or Huck.

One of the best boards I ever had had 1.5 degrees vee/side (3 degrees total) and twin fins canted 10 degrees off that - a 6’ 6" x 18.5" swallow tail.  I got tubed on it at Rincon and rode it for a decade at one of the most challenging tubes to be found anywhere with great success.  I once had a barely-attached freefall takeoff where the instant I felt a wee bit of positive contact with the face I cranked the board over as the lip hit the flats outside me.  So don’t worry about the added angle with the vee.  I still do 10 degrees of cant for boards that warrant it - ones that will spend a lot of time cranked over on the rail.  Actually, the most critical components of side fin installation is proper longitudinal location of the fluid dynamic center of pressure and the correct toe-in.  Finding the center of pressure of a fin is more of an aerospace engineering dissertation, and beyond the scope of this brief reply.  But, for a standard thruster fin template it is about 1/4 inch back from the center of the base.  I used to locate that based on percentage of board length, but I am now tending towards using a percentage of the tail length as defined by the distance from the wide point to the tail (nose styles vary).  Foil camber adds lift, curve creates suction and having one side curved more than the other creates lift, so we toe in the fins to properly align the zero-lift angle-of-attack.  The problem is that nobody actually knows the zero-lift angle-of-attack of any fin, and there are variations between different fins: using some theoretical tools that an MIT engineering genius buddy of mine taught me, I calculated a 2 degree variation between Futures thruster/twin/flat-foil/V2-foil/bigger/smaller products zero-lift angle-of-attack.  As little as 1/4 degree toe-in variance can be the different between a magical board and a good board.  Yes, I’ve added some glass on one side and sanded down the other side on fins to get them adjusted just right for a board on many occasions.