First PU build - 6-0 diamond tail stubby speed egg

I posted up in the What I’m Working On thread, but I’d rather not clutter that thread with constant updates.  So I’ll start my own.  Comments are always appreciated, and I hope it will serve as a guide for anyone else starting to build in their garage.  I’m also shaping the whole thing by hand (no electric planer).

60DT
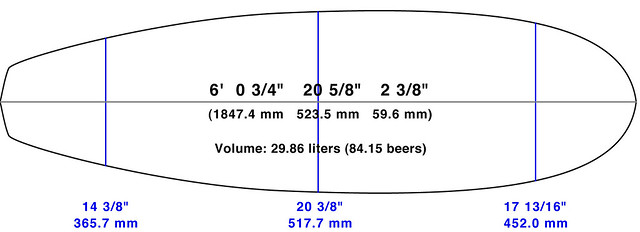
Here’s my AKU outline.

I printed it out and taped up the pieces of paper. Took 5 sheets of 11x17. I printed each sheet with a border to line up the pages. Without the border, it’s hard to keep the pages straight with just the board outline.

I traced straight from the paper. I probably should have traced to masonite, cleaned it up, then traced to the board, but I didn’t have masonite and I don’t even know if I’ll like the template enough to wanna keep it. Tracing from the paper wasn’t too bad, and I’d end up cleaning up the outline with a sanding block any ways, so I didn’t think it needed to be perfect.


I traced the template on the deck (didn’t know any better) and was quickly corrected by a forum member. He some great points about why I should trace and cut from the bottom. I also wanted to re-do the template and pull in the tail a little, so I did it on the bottom.

Measure twice cut once. And don't horse around.
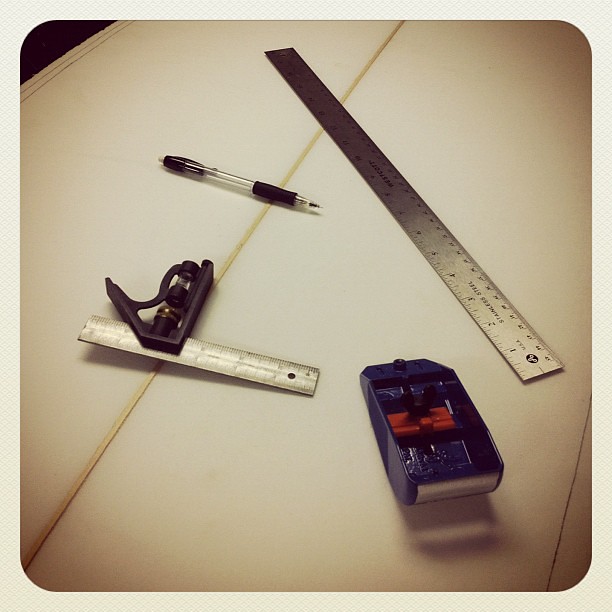
Tools. Marked my nose, tail and wide point and aligned my template. I ended up grabbing an EZ- Square Pro from Foam-EZ after dealing with a square and ruler. The square and ruler work fine, but it’s not nearly as simple to deal with. Slapping the EZ Square Pro down is so much simpler, and leaves much less room for error.

I cut it out with a saw, and left like an inch of buffer around the outline. I’ve only worked with EPS before, so I wanted some foam to play with before getting to the outline. Then I used a soft sanding block and 40 grit to get to the outline. Then 80 grit to fine tune and square my rails. The softfoam block was kind of difficult to keep square, so I wrapped some 120 grit around a wood block to square up my rails. Worked well for me.

Outline
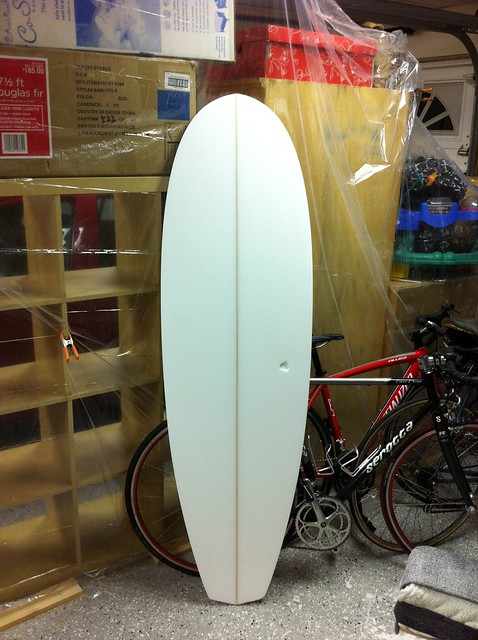
Here’s my outline as of now. Once I smoothed the outline and did my best to clean up the highs and lows, I skinned the bottom with a block plane.

Tiny barrels.
Little barrels!

I started at the stringer and worked my way out toward the rails. It cut fairly smooth, but near the rails it got a little chunky. I suppose it won’t matter much, since I"ll be shaping all that foam away when I work the rails and thin out the volume of the board.

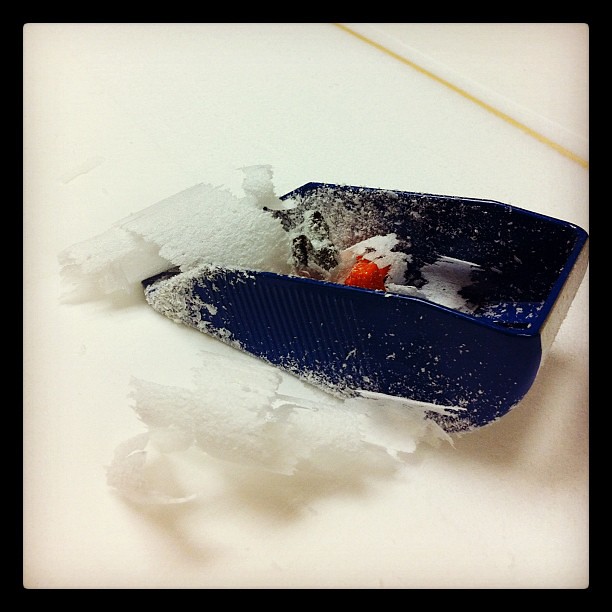
So that’s where I stand now. The blank I got was a second from Foam-EZ, so it has a bubble hole on the bottom. They told me to fill it with some extra light drywall spackle and distilled water to thin it. I was thinking of filling it tonight before going farther. Would you guys recommend filling before shaping? Or fill before glassing? Also, the hole has some skin on it, should I route it out? Or will it be ok to just pour the spackle in there?

Dusty
Also, this is what happens when I’m too lazy to move my bikes out of the shaping area before sanding. Doh!

Outline looks good. I would wait to fill that void till you’re just just about done (just what I would do). If you start catching on it and making it worse then stop and fill it.

I’ve made some progress, slow progress. I altered the original outline a little, and brought in the nose.  It felt too wide for being a 6-0 with not a ton of rocker.  Plus, with a hull’d entry, I want this board to really plow through steep faces, rather than float.  But who knows, it’s still all weid to me.


Since I didn’t use an electric planer, I’m constantly checking the thickness’s from side to side. Trying to even out any warbles from taking down volume with just a pad and block plane. I definitely think the next board will be electric planed, but I can’t imagine cleaning up the deck and working rails with anything but my hands. I guess I’m not really a numbers and lines kinda guy.


caliper
Here’s a .gif of a caliper arm I drew out in Photoshop. I traced 2 of these in masonite, cut em out, cleaned em up and connected them with a bolt. Cheap and simple. The file size is pretty big, so if you wanna make a smaller one, just resize it down. I believe the inside dimensions of this template (point to inside) is like 15", so it’s pretty overkill.

I made an egg shape recently too for a friend, it was my first design of this type. any pointers? i think these boards will turn out to be really fun. attached is my design


zach


Cool! I’m in Fullerton–tend to surf Blackies. I’d love to hear how it goes once you get some good surf. Maybe head down South? I’ve had some luck in the North SD area.

I finally finished this board.  I didn’t glass it myself, because my wife will kill me with the mess and smell.  But no burn throughs this time, so I guess my finishing skills have improved since the last board.


I still have yet to get it into some decent waves. So Cal has been cursed with an early summer flat spell with south winds. But it performs fairly well in waist high slop. Paddles much better than I thought it would, and it has great side to side slide through the middle. Riding it with a 6.5" fin.

And I finally jimmy rigged some side lights in my garage. Working out fairly well so far. They’re strung up on little pullys, so I can raise and lower at will.

Nooooo!!! (The sound of me yelling!) Spackle is no good for deep holes.  It doesn’t dry in the can for the same reason.

Microballoons and epoxy.  Mix the epoxy before you add the balloons.  Don’t breath them in while mixing!  pour that into the hole.  Putty knife smooth.  Never know it is there unless you try to tint.

everysurfer is right! I also add foam dust to the mix (epoxy + microballoons + foamdust) when I need to fill foam under glass.

Thanks for the info!  I didn’t end up spackling anything, because by the time I shaped the board down to spec the bubble was gone.  Luckily it wasn’t a very deep bubble in the foam.


Should I still use Epoxy + microballoons when glassing with poly resins?  Or is that method for epoxy laminating only?

Polyester resin+ microballoons+foam dust then.  I’d of just spackled that little hole, though.  We’re talking polyU foam I assume?  Cool little board, too.  Mike

PolyU  foam?  Hence the title of this thread.  Read, Rooster, read.  Mike

Sweet board. Where are you going to surf it?

Thanks!  I live in Orange County, so I’m usually surfing Newport or Huntington.  Mainly Huntington cliffs because I work right over there.  But the Newport Jettys are my homebase.

Still have yet to get it into some substantial.  I’ve been riding it with a fairly stiff 6.5" fin, and I think I need something bigger.  Maybe bigger with some flex.

How was the block plane for doing the botom? I’m about to pick one of thsoe up, was it hard to maintain the proper thickness across the bottom?

It worked fine for skinning, but that’s about all.  It doesn’t take any volume down when it comes to foam.  So I used it to get the skin off, then 40 grit for volume.  Took a looooong time, but I have nothing but time right now.  Just be sure to make long even passes, or your board will be wonky with bumps.

The blue block plane is a really thin razor, so it’s not ideal for taking down the stringer.  It works in a pinch, but not as good as a thicker bladed Stanley.  I use the blue one for planing down balsa hand planes though, so it still sees it’s fair share of use.