What’s your thinking behind putting the carbon rods diagonally from rail to rail? I can’t see where that would add any strength to the board, but would add alot of work.
Man, talk about being able to tune a board though. You can make exact copies, like kendall had mentioned, and really play with one variable at a time without having to worry about the shape at all. You know it’s gonna be exact from one to the next.
It’ll be interesting to see what final results you end up with.
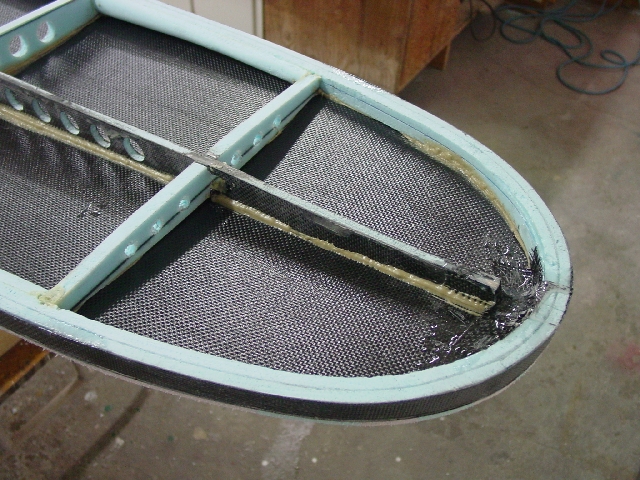
Check out the pic of the Salomon I posted on the first page. Those EPS foam supports seem like a simple solution to internal stiffeners problem. Light, easy to shape, cheap and would help a little bit with the compression strength. The center stringer seems like it would be a stress riser as you have it in your current test section. It will be cool to see your mechanical testing results.
Looks like you’ve got kevlar in the mix on the new test section? If so, what problem did you find with the first test section that the kevlar is supposed to fix?
Fascinating post, can’t wait to see more! Amazing work.
Have you considered some type of isogrid for the skins of this hollow board. After following your previous build, I feel like you would be the most accepting of an untested (on surfboards) design.
but you could have done the same 5 second google search.
Lawless, Does that answer your question? I got the Idea from Keen’s post early on in the thread. The Isogrid skin added considerable strength and tortional stiffness. I am experimenting with kevlar because If I can replace a layer of carbon with kevlar it will save money. Also kevlar will help protect the board from a puncture.
I made many more mistakes on this next test section. Fortunatly, with every mistake I learn alot. Here they are:
I made this test section in two steps. The carbon/kevlar outter skin was allowed to cure first. I used peelply to produce a bondable surface on the kevlar. Unfortunatly the bond between the skin and the foam core is not strong enough. I need to create the part in one step rather than two. All the resin must cure simultaineously in order to keep the skin from separtating.
I used kevlar on the outter side of the foam core, Unfortunatly the outter side of the deck experiences compression. Kevlar is best in tension, not compression. I need to replace this layer with carbon and apply the kevlar to the inner side of the foam core. I will also use additional carbon reenforcement on the inner side of the foam core.
While applying the foam and the inner carbon layer, I failed to pull a vacuum during the cure. I had a leak in my fitting which connects the hose to the bag. I tried like hell to fix it, but after 2 hours the resin was nearly hardened so I pressed the carbon into the isogrid as best as I could with my fingers. The result is less than satasfactory. You will notice that the inner carbon layer does not fit tightly around the isogrid. Instead the carbon is streched over it and there are large air gaps around the corners. The test section came out a little heavy because I could not bleed the excess resin.
Overall this test section is much better than the first two (I did not show pics of the first one becuase I am too ashamed!! It went out with the trash last monday).
Notice that the seam is much better. I am working to produce an almost unnoticeable seam. The overall surface finish is nearly flawless fresh out of the mold. I sprayed the mold with automotive clear coat first before laying the carbon. The result is good. I will try polyurathane next. I will eventually join the two halves. More to come!!
I have been reading for a while here but never posted , This is right up my alley however So here is my contribution to Swaylocks
What density is that green foam ? 60kg/m2 Divinycell ? I have used that and the greyish 80kg and the orangeish 110kg and can assure you the denser foams are way tougher re dent resistance and when you factor in the smaller cells they consume way less resin and are not much heavier when wet out
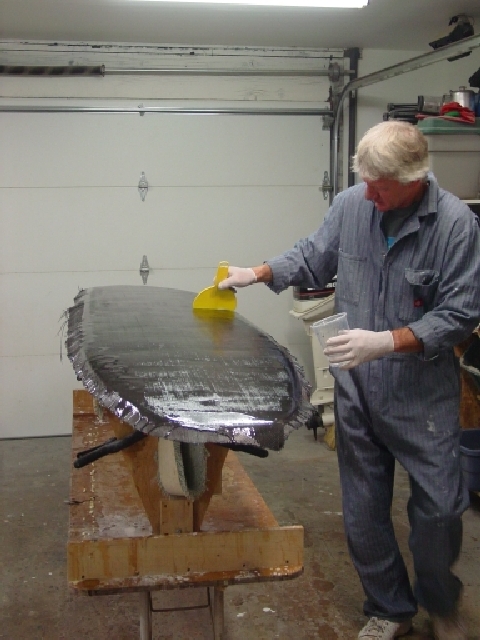
Here are some shots of a process we use here in my Gold Coast factory (less than 1km from Firewire by co-incidence !!)
Here are some photos of a 12 foot racing paddleboard I Vacuum infused with Vinyl ester resin .The resin is introduced via the clear plastic tube to the spiral wrap which runs down the centreline of the board . It then seeps sideways through the red diamond flow medium and down into the cored glass laminate
The 1st and 2nd photos show the deck of the board being infused ,in photo 1 you can tell there is an integral joining flange that is constructed at the same time as the deck ,photos 3 and 4 show the bottom of the board ,you can see the flow is a lot faster where there is an overlap of the flow media
I realized I don’t have any photos of a finished board , I will take some and post them ASAP
Cool…latman…I was going to say infusion & kayak…but racing paddleboard is way better. Love it. Thanks so much for opening a little door into your world.
Here’s a little something that fits in nicely with your work & this thread. If a picture = 1000 words, this link will take a heck of a long time to read. Look closely - everyone following this great thread will probably see things they recognize, as well as things that stretch their imaginations. Personally, I can’t quite get my head around any of the negative spaces yet…but all this knowledge sure helps point the way forward. Thanks so much for contributing…
you mentioned that you were going to test your samples in a mechanical properties lab. I am interested to know what type of test you are considering. I have often wondered what type of test would be most appropriate for simulation of stresses experienced by a surfboard during a session. I don’t know if you have any familiarity with mechanical tests, but it would interest me to discuss these tests as I come from a materials science background. Also a true isogrid consists of equilateral triangle spaces between the supports. This design is somewhat less than perfect for what you are doing, from what I understand having equilateral triangle spaces allows you to “smear out” the properties of the isogrid to find average properties I don’t think it is super critical to keep your surfboard isotropic. One more thing I have a paper which describes a procedure to form launch vehicle fairings and solar array support panels involving a isogrid and skin vacuumed to a male silicone rubber mold. If anyone has access to a journal database they could look up this paper “Continuous Fiber Composite Isogrid Structures for Space Applications” or if anyone is interested I could scan it in as well. As soon as I read this paper I thought how can I alter this for surfboard production I don’t think anyone has done this.
Here is the last test section I will make. I will take the test sections to the lab on thursday. I only plan to simulate the load of a foot pressing against the test section. The test is just to see how much weight they will support, and where the stresses are concentrated. I am incorperating the test into a project for a class.
How about standing on it, with your own foot, rock onto your heels, balls of your feet, bugger it, use both feet at the same time, jump on it…I dares ya…
Your finished board will be stronger than your section, because it won’t (I hope) have open ends. A closed box is much stronger than an open one.
Just my opinion - remember I’ve built hundreds of hollow carbon boards - you are there, strengthwise. When you get to making completed boards, you may want to set up some methods of measuring flex. What you learn from that will be of tremendous value, since flex will affect how your board surfs.
Unfortunatly, we had problems with the computer and measuring equipment in the lab yesterday. The test was unable to be conducted. It will be postponed to a later date. I am going to start making a full board now. I feel confident in my technique.
That’s the spirit. You’re there… I wanna see a finished board.
Make sure your seams are perfectly joined - I think this is the most critical part. If your rails don’t fold, your deck and bottom will be perfectly strong, especially with the foam stringer it looks like you’re putting down the middle.
Here’s a quick word from my soapbox about foam - Whenever we used foam on our boards it deadend the feel… any amount of foam… anywhere on the board. I’m not saying that’s a bad thing… but it’s a thing. Our goal was always to make the most lively boards available. We also wanted them strong and easy to reproduce. We tried foam in our skins (like you’re doing), foam stringers, foam rails, foam core… we ditched foam.
We used aluminum honeycomb instead. Aluminum has its drawbacks - it’s prohibitively expensive, hard to find in the right size, really expensive, hard to find at all, really expensive, and it doesn’t like contact with salt water… oh… and it’s really expensive.
One thing I wanted to try, but never got around to, was balsa in the skin. Balsa transmits feel really well. I’ve seen matting - in various thicknesses - made of balsa end-grain squares. They come in sheets and rolls. I know Svendsen’s boat supplies in Alameda has some. I’d try 8oz carbon, 3/16" balsa, 8oz carbon - deck and bottom. I’d also add some magic (but simple) elements to the skins - that I’m not allowed to talk about - and ditch the stringer.
If and when you glue the stringer in, make sure you use a flexible adhesive. It’s all about sheer strength. Remember the deck is trying to compress the joint and the bottom is trying to stretch it. If you use something brittle, the stringer will break loose.
I’m stepping off my box now… you’re doing a really nice job so far.
Ive been thinking about your “magic” stringer… and I think I’m on to something, I won’t say.
Do you think I would benefit if I used balsa for the stringer as in the first test section (as in pic # 37)?
What specific adhesive do you think is best for adhering the stringer?
I have also been considering end grain balsa as a core material to get rid of foam’s dead feel. I might get some for the next board. My HWS is all carbon and balsa and it does not feel dead at all.
Its handy other places too - I use it for my first rail layer before the skins. Supports the edges of the skins with hardly any weight penalty and provides a better gluing surface for subsequent (after skin) rail layers…Hope this isn’t too much of a hijack, but hardly anyone talks about endgrain balsa.