how i fix snapped in half surfboards

so this is the way that i fix snapped in half boards

first i clean up the snapped area and the stringer so the two halfs fit together nice just like in the BB thread

[img_assist|nid=1062456|title=snapped board|desc=|link=none|align=left|width=324|height=219]


[img_assist|nid=1062457|title=snapped board|desc=|link=none|align=left|width=325|height=219][img_assist|nid=1062459|title=snapped board|desc=|link=none|align=left|width=337|height=227]


[img_assist|nid=1062460|title=snapped board|desc=|link=none|align=left|width=409|height=276]


now i need to get the wax off and do a test to make sure that the board fits together properly

more to come later

oh ya i just want to say that this is probably not the best way to connect the 2 ends together but it works for me

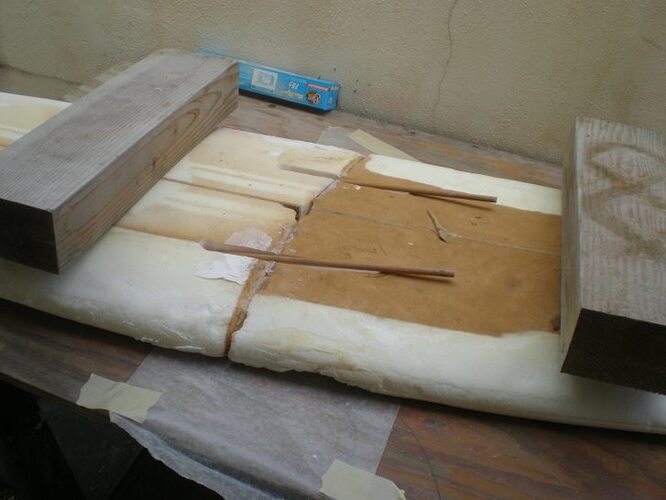
so now i clamp the 2 halfs together to make sure everything fits just right

[img_assist|nid=1062462|title=snapped board|desc=|link=none|align=left|width=398|height=269]


i had to add some tongue depressors under the the paint sticks to get the rocker just right

so i did my test and all is good

now i take it apart and i use a 2 part foam to connect the 2 pieces together

[img_assist|nid=1062463|title=snapped board|desc=|link=none|align=left|width=363|height=245]


now i mix up the foam and pour it on the exposed foam then reattach the 2 pieces together

now you will only have a few minutes to get everything just right so be ready and dont wast any time

[img_assist|nid=1062464|title=snapped board|desc=|link=none|align=left|width=389|height=263]


[img_assist|nid=1062465|title=snapped board|desc=|link=none|align=left|width=441|height=298]


now you let the board sit for about 10 minutes then you can unclamp it and sand down the foam

ill sand the foam so that it is under the fiberglass and then ill fill it with microballons so i can try and hid the ugly pour foam color

[img_assist|nid=1062467|title=snapped board|desc=|link=none|align=left|width=276|height=186][img_assist|nid=1062468|title=snapped board|desc=|link=none|align=left|width=304|height=205]


once i got everything filled then im ready to laminate

ill use 3 layers of 6 oz cloth on both side of the board

maybe a little over kill but i need this board to never come back to me snapped in the same spot and so far i never have gotten one brought back so i think this works fairly well

[img_assist|nid=1062469|title=snapped board|desc=|link=none|align=left|width=336|height=227]


this is how big of patches that i use

now its time to laminate

[img_assist|nid=1062470|title=snapped board|desc=|link=none|align=left|width=392|height=579]


more to come later

SDRepairman - excellent thread, great pics and explanation - love these "how-to" (or "how I"?) threads, this stuff is priceless info.

------

question - is that pour foam strong enough by itself (once its set) to hold the two halves together while you're working on the board?

Thank you and very timely since I have still yet to get to my snapped nose repair.

I’d love your input on how to repair a leash plug pull-out that tore the bottom deck loose.

hey Huck the two part foam is extremely strong, it holds to 2 pieces together vary well, i get this foam from US composites and it comes in a bunch of different densities

in fact if i dont get the board set just right ill immediately take it back apart because when it is cured and if the board is offset then when you go to snap it it will often snap the board an inch or two away from the original snap, that is why i do a test first to make sure i can get everything in the right place

but if the rocker is just a little bit off then just like in the BB thread you can cut into the board a little and flex the board to get to your desired rocker

hey red boards, if i was fixing the board i would remove all damaged glass and foam then i would use this two part pour foam and fill it in, then i would sand it back down then fill it with microballons to hide the pour foam, then once the filler is sanded down then put a new leash plug in then glass over it all and hot coat, hope this helps and good luck

more pics of the repair coming soon


Would you recommend the two part foam over gorilla glue?

so now i have laminated the top of the board with three layers of 4 oz cloth

to elaborate a little about the patches on the board, when i cut them i do it in a diamond shape and the reasoning behind it is that since the cloth is at and angle going across the board it spreads out the stress load on the board( have you ever seen a board snapped in a vee shape, they always snap in a straight line across the board) and the biggest patch i make will have the biggest laps as well and the smallest patch will wrap the rail the least so there is a smooth transition

hope i have explained this properly or if anyone else can please do

[img_assist|nid=1062481|title=snapped board|desc=|link=none|align=left|width=379|height=256]

SD,

Your doing it perfect!   I'm waiting for someone to say.."hey SD why don't you put wood next to the stringers, it needs to be sistered...OOOH, it won't be strong enough without wood"

I do it exactly the same way...and i've never..never..ever had a board snap in the same spot.

Nice job.

good to hear from you resin head, thanks for the complement

almost every person that brings me a snapped board always ask if im going to be adding some doulls or putting in some wood around the stringer and i always tell them NO. they always give me this look like i dont know what im doing but then i explain to them where the actual strength comes from when fixing these boards then there ok with it, i always get a good laugh out of it

but anyway here is the board getting hot coated

[img_assist|nid=1062485|title=snapped board|desc=|link=none|align=left|width=359|height=245]


ill do the deck first and i dont tape off the rails, i just let it run to the bottom of the board then when the resin has cured i just sand the flats tape off the rail then hot coat the bottom

[img_assist|nid=1062484|title=snapped board|desc=|link=none|align=left|width=324|height=219]


now ill pull the tape just before putting the board outside to cure

one thing that i do to help get a nice flat hot coat is to put a little bit of resin down first and use a squeegee and forcefully rub it all around the area that im going to hot coat then squeegee it all of, then ill do the normal hot coat, using the squeegee helps fill in any little air hole or picks up any little piece of dust

hey Doyle i would use the pour foam over gorilla glue any day, this pour foam is extremely strong

so now that i have the boar to hot coat i start sanding

when im doing my finish sanding ill start with 220 on the flats

[img_assist|nid=1062503|title=snapped board|desc=|link=none|align=left|width=386|height=261]


[img_assist|nid=1062504|title=snapped board|desc=|link=none|align=left|width=386|height=261]


then ill sand the flats and the rails with 320

[img_assist|nid=1062506|title=snapped board|desc=|link=none|align=left|width=446|height=301]


now its time to put the finish on it

first ill scotch bright the repaired area

[img_assist|nid=1062507|title=snapped board|desc=|link=none|align=left|width=467|height=315]


then ill wipe down the repaired area with some acrylic( floor wax)

[img_assist|nid=1062508|title=snapped board|desc=|link=none|align=left|width=473|height=319]


once the acrylic has dried then ill scotch bright it one more time

if you dont get all the dust off the board before putting the acrylic on then you will get little bumps in the finish, if this happens then use a used piece of 320 to rub down the bumps then scotch bright

also when wiping on the acrylic be sure to wipe underneath the rails so you dont have any drips,

the drips when cured can be a pain in the but to get ride of

[img_assist|nid=1062510|title=snapped board|desc=|link=none|align=left|width=475|height=321]


now just wipe off the dust and wax it up and your ready to ride it again

so hope this helps everyone out there and good luck

The one time I did a snapped board I used a very similar method with 1/4 inch luan ply clamped across the deck and bottom to hold things in place. I just used lam resin to glue the two parts together and layed wax paper across the area so the resin wouldn’t stick to the plywood. I also do diamond shaped patches. Sorry, didn’t take any pics.


Gorilla glues sucks for putting boards back together. It expands and leaves little bubbles. Plus, if you use it in a case where the glass is stripped back it’s much harder than foam and cannot be sanded flush, easily. You will likely wind up with a ridge or high spot and low spots in the foam.

Here is a 7-4 McTavish Carver I put back together. Doing a resin swirl to cover up the repair.


sdrepairman-

When you fill with microballoons is the surface then flush with the existing laminate?  Or is it sanded below ?  I’m trying to figure out how to blend in my repairs as good as yours and keep them structurally strong. Thanks

ps excuse my ignorance but what is a microballon?


great thread !

very cool sd, never thought to use the 2 part mixing foam; im going to order some and try it out.

rhody rider / IanT

I initially join the smapped board back together with q-cell & resin although I would think that microballon would also work for this also. After I get the repair area filled near the surface, I route out (2) channels next to the stringer and add wood dowels with resin and fiberglass rope. Next I take my dremel tool and route  the repair area so that the q-cell/resin mixture is about a 1/4" below the surface of the foam. I fill that 1/4" crack with light weight spackling paste let it dry, and sand the entire repair area with 60 grit sandpaper that is attached to a 3" thick soft foam pad so you can reproduce the original board shape as close as possible.

I get my microballon material from fiberglass hawaii.


I see that you have a gravity assisted compressor. Don’t even have to turn it on.