HWS build thread - board #2

Hey swaylocks, I have been lurking for a couple years but haven’t posted anything.


I’m starting my second build, a hollow wooden midlength. I met someone a couple month ago with a functional and beautiful hollow wood board that sold me on the idea, then I came up on a bunch of nice wood from a demo’d building. Figured I had a good opportunity to give building a wood board a go. Plan is 7’6” about 2.5 thick and 21.5 wide. Trying to make a all round board for humboldt winters, from about chest high to good size overhead rolling waves. Most of the spots I ride there is a lot of current and its usually not clean so some paddle power is nice. I’m 5’ 11” and 180 lbs. I’m an alright surfer, mostly just cruise.


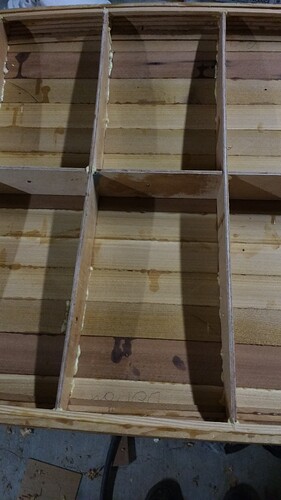
Designing the board in boardcad then using the hollow wooden surfboard template maker I found on grainsurf forum to make the internal structure. I’m using western cedar and old growth redwood that I salvaged from a building being demolished. The ribs and stringer are going to be made out of 3mm hollow core door skin from the same building. The plan is to laminate two pieces together for the stringer to make it 6mm middle and 3mm ribs. I’ve put a little piece in water for a week to see if the glue holds, and it’s looking good.


The outline is inspired by the firewire seaxe and a couple other midlenght boards I’ve seen on sways. The rocker was  based on the US blanks 7’6” EA. Rails made to be similar to a 8’6” longboard that I have that rides good. Bottom is going to be flat to small vee peaking about 26” from the tail tapering to flat around the fins. Thinking about either quad or 2+1 for the fins.


I’m going after a bigger version of my last board, making some improvements. My last board was PU/Epoxy and I used a blending curves egg template.  I really enjoy that board but the rails are something that could have been better. It takes a lot of effort to lay the rail in deep bottom turns and stuff. Attached is some pictures of the egg I made. Shaped and glassed by me and my friend who’s made a couple boards. The masking tape is from some dings I was fixing. 


So i’m wrapping up the planning phase and here’s my current design, what do you guys think? Any guidance and suggestions are greatly appreciated!


Sounds like you have a pretty clear vision of what you want.   Hope you continue with some build pics, I need to get motivated on another wood board!

Thanks Huck!

Your wooden boards on swaylocks and grainsurf are awesome and def and inspiration. 

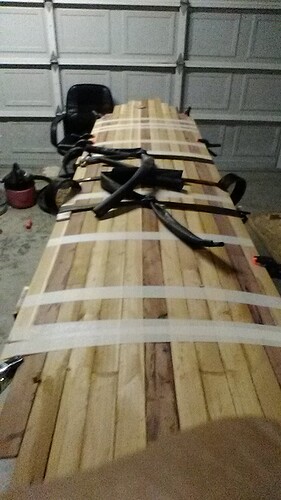
Here are some build pictures. Done with the strip rails. used titebond 3 to glue the strips to each other and gorila glue to fasten to the plywood. It seemed like a good idea, but I’m not sure if that made a big deal. There was a bit of a learning curve to putting a bevel into the strips with a hand plane so the first couple strips had gaps in between them. The strips weren’t long enough to go the whole length, so I glued extra length in place. For the deck I’m using the same length wood and I’m going to try scarf jointing the planks before I glue them onto the board to get the full length. 


A few more pictures of the build


Dig the pics, Keep em coming.


I’m building a  Cedar HWS too but use a different method, less ribs more stringers.


I’d completely forgotten about the White “C” clamp method, thanks for reminding me of this option as I was dreaming of another 100$ in bessey adjustable spring clamps for when I attach the deck. But money is tight and I do havesome black ABS piping of adequate diameter to retask for this purpose.


HWS’s like to twist on their own, make sure that table and your specers are precise when attaching hull and deck to the structure.


I had one twisted go left like a bot out of hell, and bark like a dog on rights.  The twist can be caused by many factors in with my technique, not really so sure using your technique, But I am contemplating methods to prevent torsional twisting before I apply/ clamp and weight the deck panel.

Nice work! Strip rails are a pian in the ass, but the look is like nothing else.

Here is a link to my last build if you are interested.  I figured out some tricks that you might be able to use.


https://www.woodboardforum.com/forum/design/workshop-tool-ideas/1160-in-progress-build-thread-8-driftwood-kit-from-brad-tucker

Interesting solution for a rocker table with the various length blocks underneath. How’s that working for you? Can’t wait to see the finished board.

Wood boards = labor intensive = beautiful finish

Thanks Tom! 


Yeah it worked out ok, I’d probably do it differently next time. there was a little bit of sag in the plywood so the nose and tail blocks don’t contact the board. It was kind of annoying when clamping because the rail touches the plywood and I had to lift the board to get clamps in there. 

Thanks for the heads up about twist! Wasn’t even thinking about that. 

Do you glue up the whole deck and bottom in one pannel? I was thinking about that, but I feel like I would have more control if I went one or two at a time. PVC clamps are great, saved so much money! 

I have seen your build thread before, looks sweet! The blocks you put at the nose and tail look like a good idea, I put one on the tail after I started the rails because I was having problems with the glue joints. So did you strip the deck one piece at a time? Also are the 1/4 inch basla strips on the ribs are for increased glue area? how’d did that work out for you?

I do the hull panel In two halves so I can hold them together and keep them symmetrical in fine tuning the outline, then join them, then bend it upto the stringers.  Panels glassed on interior.  No wood glue, all epoxy.


The deck panel is also one piece after I’ve built up the rails on bottom panel, Domed the deck,  and added the required internals supports.


The one piece deck panel does not like to accomodate the nose flip and the dome of the deck. I was going to do a 3 piece deck, but recently decided to join the 3 panels into one instead.  Adequate clamping pressure  and weight, can get deck panel to bend to dome and nose rocker, but this could lock in a twist.  I’m at the internal support stage and reclamp the deck panel to deck overnight so it gets used to the idea, but so far it is not happy at the prospect.  My deck panel is glassed on the interior. limiting what it will conform to more so than just edge glued planks.


My rocker table is also prone to twisting or some sagging, and resides on an uneven concrete slab, So before any epoxy mixing  stage which could cause uneven forces, and the twist, I spend some time truing up the table.


I’ve spent much effort in combating the inherent twist to this point, and making sure minimal clamping pressure and weight was required at each stage by various methods.  Right now the board rests fairly close to twistless when off the table.  Still flexible enough to counteract what is there, or lock in an undesirable twist at the next stages.  Once the deck is adhered, One can only try and shape out any twist, and there is not enough wood to shape out more than 1/8 inch of twist, and having to do that, is undesirable.


So labor intensive, I want the board done, but I can’t just start half assing it now.


I’ve no experience with the single stringer multiple rib HWS method.  It seems many boards built using that method have weird bumps  and flat spots in the outline in the nose and tail, instead of a graceful curve. 

Update on the board, Ive finished the rails and deck. did the deck one piece at a time. 


next steps

Glass inside of deck with 4oz - This is also to connect the deck to the ribs a little better. I’m going to overlap onto the ribs a little. 

reinforce fin box area and vent plug area - Going to do quad fcs fusion because I have access to that jig. Not sure what the plug is going to look like yet.

Glue up bottom -  Going with a pannel for the bottom. Trying to decide if i should glass the inside of the pannel or not. If i glassed the inside I would plane down the boards a little thinner. 

Nose and Tail blocks - Left the nose kind of funky to I’m going to cut it back a little and put a block. 


Finally Finished the board. Decided to beef up the construction a little because the board has been taken so long. Ended up doing the bottom in a panel with glass on the inside and glassed the inside of the deck with about 1’ overlap onto the ribs. The whole inside was sealed with thinned epoxy. Glassing went ok, It was too cold in my garage and had some issues as a result.


more build pics