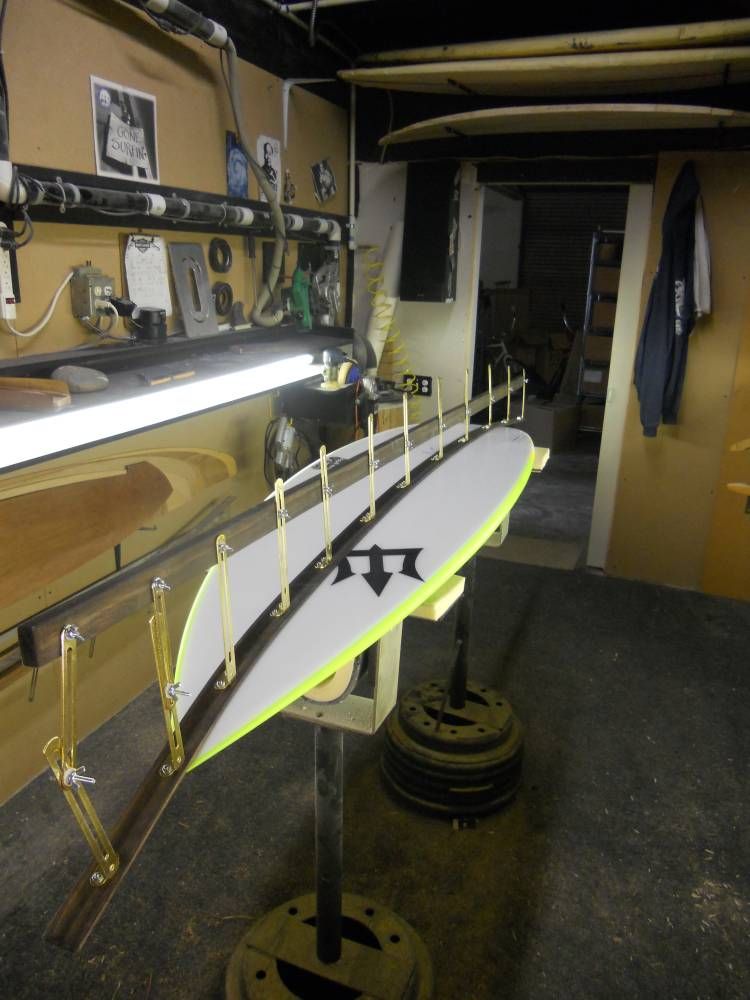
My first rocker Templates!

Folk’s- I decided to do it right and design my own personal rocker templates. No more geuss work etc… etc… I will now use these to shape & design my boards.

HowI did it: normally I’d use a jig saw but I lent out my power coord so I used a Japanese pull saw and struggled. I’m happy w tail rocker section, but will need to sand a little more on my nose section. Might make another?

Note: these are designed wherever YOU want your rocker to start and end…that said, I have my own ideas how I set mine up. But you can take ideas from boards you tried, or figure out where your rocker break lines will start and end. Also, figure out what rocker numbers you prefer at the 12", 24" and tip. On my tip I am going with
3" of nose rocker, 1 1/4" tail rocker.I figure it’s ‘close enough’ for my designs. If I want more flip I designed in MORE FLIP -around 4" out the front of my template… this allows me to adjust as needed on say
A different build. I end by saying my numbers are within 12"-24" and tips stations and I’m not telling my own #'s. That said, you can get hints on a proven nat rocker on a blank you like… then figure out the math.Or you can figure out your own ideas and learn from it.Good luck.


Shouldn’t rocker templates be full length?

hello Beerfan! I honestly don’t know how to make a rocker template I just made what I’m thinking about. I think you make it to half length of board. But I don’t see a reason why. I mean, I don’t think I want my breaks to be really high. Maybe some experts will chime in.

Well, I didn’t have to make another template for nose half! I just trued it up.

Shapa,

First thing I do not claim to be an expert.

I just play one on TV.

First, where did that curve come from?

Is it the “magic” rocker curve?

How did you copy it?

Measuring and duplicating rocker is tricky.

Was the board level, the racks, was the stick level?

Other than having a blank company give you one,

That curve must be copied perfect.

Nose to tail.

This tool was created just for that reason.

Once you have that rocker template,

you have to figure out how to change the blank to that curve.

That little template may kinda work. Move it 1" and it wont.

Barry - ty for the info! The info I got for curves was my own interpretation from info I got from a local Shaper. I even talked to another shaper who talked about “pivot points” in tail rocker, kick etc… tried boards w nearly flat tails and they all work excellent.

The curves not moving a 1" , but I left my template longer incase I do want more rocker. But might not work? Just a crazy idea…prob didn’t really think of the rocker stretching out…might work on longer board?

How I designed it: flexy wood yard stick, and did it ‘any way I can.’ :slight_smile:

Barry - I ran into a vid of yours on vimeo -good vid!

The plan is to plane in to these points, and get my curves to fit my template. I’m just going to fade my cuts in from the tail w skil 100 . Same for nose section. Then blend in w
block or surform. I usually resort to surform first. Gonna blend everthing into the whole. I’ll do my best to get it perfect. Also, the plan is to plane low and slow until I get better acquainted
W planer.


Hi Shapaholic,

It’s good that you’re into templates now, it’ll make your shapes much better overall so long as you have the right numbers and you hit 'em.

Barry’s type of rocker stick is high on my list of things to do, but for the time being I make MDF templates like yours, only full length. Partial templates on the bottom will cause more trouble than than they save.

If it’s helpful, this is how I make mine. Has to be done on a really flat surface!

I lay out a length of MDF and and draw a straight line end to end, with a length of aluminium beam. This is the datum for the rocker values.

next, I use a rule to mark the 6" 12" and 24" rocker values at 90 deg from the datum.

then I use very small nails and nail them at the end of the lines I’ve drawn… Ie, if the nose is 4", the nail is exactly 4" from the datum line at 90 degrees.

Once all the numbers are nailed, it’s time to join the dots. Take a length of MDF (the outline template is perfect for this) and lay it down on its straight edge. Gently push the MDF up against the pins from the deckside inward and once place hold them in place with a dumbbell weight or sandbag.

Once it’s all snug and true, take a sharp pencil and trace the outline on the other side from pin to pin until complete. Note, it’s hard to get a very tight curve with the whol temp layed out, so just conform to the numbers first, then you can go up to tha 12" pin and give the curve special attention to nail the nose flip you’re after.

Time to cut it out now. I use the biggest hand saw I can get, and try to do the cut in one go with as few little jags and bumps as possible. the bumps are a real bastard to chase around with sandpaper.

Now clean it up by looking along the curve and lightly sanding with 80grit till its a nice cohesive curve!

They first time I used a rocker template, was from numbers someone gave me and it was the best board I’d made so far. Now I use my own numbers, and it’s advanced my understanding a great deal. It gives you real control of your shapes!!

I can post photos of the process of it’s helpful…

Barry, with your rocker template jig, do you use a level on it’s top beam to set it (assuming shaping stands are leveled), or do you use a reference point when setting it?


Ty – Clamsmasher fti! :slight_smile: I’ll jot down your tips and try it out! Anyway, My templates are designed to alter an existing rocker in a commercial blank. Then I’ll just blend it all to fit. I suppose it’s my own vision on how I like my boards to be. But I am definitely open to learning new concepts that
I find useful. Thanks for the great tips!

Folk’s - I tested my --Skil 100 finally after having - Pete C put new blades in it, also give it a safety check; add bearings etc… anyway, he did a EXCELLENT JOB! This thing’s INSANE! It cuts waaay smoother than my hitachi. It purs like a cat, also, cuts super clean!:slight_smile: I highly recommend - PeteC to work on your skil planers.oh, and he did a perfect job cutting tail down for my short boards. It cuts in the nose flip sweet as I turn nose of planer in a bit!:slight_smile: note: this is one layer off top/bottom, surformed & sanded to level flats. Then hit stringer w block plane w blades out enough to make clean cuts. On bottom I work from center out, deck tips in…tried a little otf cuts in the tail rocker, but I stopped as I needed a drink break. Will get back on it tommorow.overall I’m SOLD on - Skil 100 planers. It’s definitely the best tool ever made for shaping boards.


Clamsmasher - if you don’t mind, please do show process and if you could show how use it that would help. Thanks.

I totally agree about boards getting better w rocker templates!:slight_smile:

PLANING TECHNIQUE:

I’m just planing from the tail end and fading out my cuts w otf thingie on my - skil 100. It’s doin it! I’m just planing low and slow until I get better acquainted w it. Overall I’m EXTREMELY impressed with the unit.so plane, check rocker at stringer, repeat, then I will plane the sides…

To be continued…

My rocker tool bends to fit ant rocker.

Top or bottom.

Easy peasy.

Can make an accurate template in minutes.

This is a tool I’ve been using for 20 years.

I’m a template freak.

Makes that process simple.

And no level on this tool.

That’s on my straight rocker bar used for measurements.

Just find center of rocker apex and line it up accordingly.