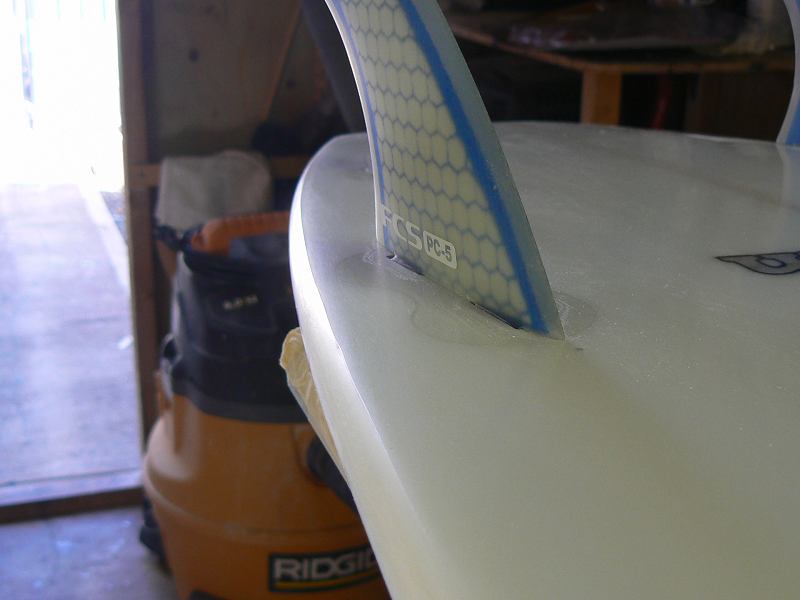
Photos of hot-coat tape job


I went ahead and did my tape job based on everything I read on here, but since there aren’t any good reference photos that I could find, I was wondering if anyone could tell me if I’m taping it right? I want hard edges halfway up that taper off, and hard corners on the tail with a tapered stringer line

right as rain.

…ambrose.

Heres a thread that links to a how to and photo explanation by me. Take advice at your own risk. 


http://www2.swaylocks.com/forums/where-do-you-guys-cut-your-freelaps


Your tape is way too high as is. I can tell you that right now. As far as Ambrose’s post I can not decipher. 

Sweet - I missed that one since it was in a thread about laps. Am I right in reading that you’re hot-coating your deck first? I thought you were supposed to do the base before the deck? Does it not matter or does it just make it easier to get the hard rails?

A short vid I made a few years ago

http://youtu.be/TfIkHG6W7hU

Video is private and unwatchable

oops…should be viewable now

I’m no pro but it’s a pretty straight forward process and here’s what works for me:

  1. Do the deck first, and make sure the tape transitions down and tucks under to the bottom where you want the sharp rails to start. This is because you need to coat this whole area in the tailward rail or else it’ll be missed when you tape up the tail dam on the other side.

  2. As said above, your dam is too high. It should be 1/8" inch high at most or else you run the risk of pooling too much resin (waste) in that area. Look at Bud’s video.

  3. I like to leave a little gap between the tape and the tail in the dam that allows a bead of resin to drip and fill between the tape and the board. This insures you have material to sand a nice square edge.

  4. That blue tape has probably fallen off by now. You may want to use high-temp tape if you’ve got it…


Looks great - this is exactly what I was trying to find to help me along… any chance you have one for the deck-side taping? I’m assuming that’s all just masking to prevent beads from dripping down to based on what I’ve read - I assume it goes a little something like this?

Will get some high-temp tape when I do the base for sure - good call on that, didn’t even think of it

For those that have glassed a few board, here’s a few details some might find useful … I usually do not tape a resin dam for hard tail edge … 90% of the time I do it this is way, works well (Sanded finish, catalyzed UV Cure PE, 4" brush, 3m 233 tape) -

Hotcoat the deck no tape. When finished brushing the hotcoat as usual and the resin has started to form a thin drip curtain off the bottom edge, brush the hanging resin past the rail onto the bottom, just past your free lap, all the way around the board. Just enough to form a thin coat of resin, brushed maybe an inch past the edge of the bottom lap.  Cure, flip, grind/feather your basted bottom lap.

Bottom lap sanding done, now before you add your cat and SA for your bottom hotcoat, brush a cheater coat of lam resin from the bottom edge of the rail and over your sanded lap, (this helps feather in any small lap gaps and gives a little extra ‘cushion’ when sanding near the rails on the bottom), avoid letting any resin drip past down the rail, then pop it in the sun to harden a bit. Quickly lay down another thin brushed on layer (Lam resin) only where you want your hard tail edge. Again, if you can, avoid letting any drip over the rail, then pop it in the sun to harden a bit.

Now tape off just below rail apex for a bottom hotcoat without the raised tape dam at the tail. Hotcoat bottom (don’t forget the SA and cat!) cure, pull tape and before it gets rock hard run a razor to cleave the resin tape line.

There should be just the right amount of built up resin to quickly sand a nice sharp edge where you want it. 

Laminations tight and flat. 

Hotcoats and basting - Don’t slop resin around, keep it neat and thin, the goal is to lessen the time spent sanding!

and remember - KEEP YOUR SANDER PAD FLAT :slight_smile:


I’m no pro either but my method is similar to Buds. I hotcoat the deck first untaped and then use a plastic squeegie and run along the bottom edge to take off running resin till it jells. Then once the deck is tack free, flip and sand the edge and lap and run a fill/cheat coat with lam resin on the lap to smooth it out. Then once that’s cured, tape with 2" tape just below the deck hotcoat line and when I get to the tail, I put the tape even to the bottom edge. Now once you have taped all around the board, put an extra layer of 1" or 2" tape on the tail edge only and go about 4 inches past the front rail fin locations. Roughly 16 inches from tail depending on location of fins. That double taped edge on the tail helps with making the hard edge by keeping just enough resin in that area. Sometimes I leave the tape loose around the edge like the link insanecutback posted depending on the outcome I’m looking for. In my opinion the high wall dam you made might make it hard to move the resin around that area and also keep too much resin from running leaving more sanding to do to level the tail. I do like Buds idea on using the razer to flatten the resin tape line when you pull the tape as it jells. Will have to try that next time. Also, I only use the 3M solvent resistant tape when glassing. I’ve used the cheaper kind used for painting and it will not hold up to the resin curing.

The resin dam is done with lam resin in a cheater coat between lam and hotcoat steps. If you start at mid board and tape the rail apex all the way around. Then when you reach where you started, begin raising the tape line to allow tape overhang above the rail line creating the dam and finsh where dam ends. Do a cheater and get resin in the dam and anywhere else it is needed. When its off, pull the tape from around the dam, but stop when beyond the dam overhang. Tear tape and match back to rail apex. hotcoat. Saves tape and a step. 

  Then flip board and make the tape line for the deck hotcoat right where the other left off. You’ll have seam on the apex and a nice edge to play with.

I usually lay a few strands of fiberglass (usually from finrope)  in the resin next to the tape to reinforce the edge.  I think it’s especially useful for the tips on swallow tails.  

Pico good tip. Never done that step by it self before with lam resin. Adding hotcoat to that must make a very good edge. I usually just filled as I was hotcoating. Will definately try your step and see the results.

Thanks again guys, great link with the photos of the tape and great tips on keeping the tape dam lower - also, peeling the tape while the hotcoat was still gel made it much easier than trying to scrape all the leftover tape out of the drips. I was left with some pretty damn sharp lines, so I’m stoked. Won’t even have to do all that much sanding to get them where I want em -


Thanks Bud!

…the way you describe it makes the process longer…

the easy way is after the hot coat with UV resin.