Despite research on Swaylocks and the rest of the web I still have not found a guarenteed way to get rid of my pin holes.
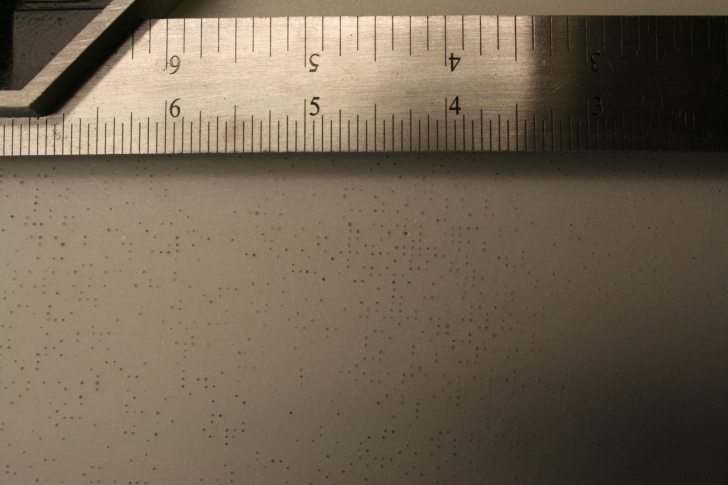
Have been making a board for a friend using Kwick Kick Resin Research Epoxy (my first experience with KK) on PU. Was warm weather, resin thickened quickly and didnt spread as far as i would have liked. Possibly I squeegeed out too much resin and ended up with a too dry lam especially on the bottom - 1 layer of 6 oz cloth. When tacky I added the sand coat. Then later when I sanded it back all these holes appeared. See photo. Why? not enough resin in the cloth? Dust? Air bubbles in the resin? Some or all of these? But more important - how do I get rid of them? I cant afford time and money to put on another coat of resin if they keep coming back. I know they will. They have on one of my own boards and I gave up and left it pinholed. But this is someone elses board.
Some options:
Leave it as it is. I dont think water will get in (dont appear deep) but dirt will, the board is going to look terrible, my mate will not be impressed and I will not get any more orders.
2)Try another coat of RR but risk a repeat, my friend’s light board will get heavier and the pin holes will reappear and I will be caught in an endless cycle of resinning and sanding and spending money and time.
Try a different type of resin but it would appear that all resin will pin hole now.
Gloss coat of PE - but its going flex different and chip off/ crack.
2 pack PU which I have never used but will it fill the holes and is very toxic.
What about 1 pack PU, clear yacht varnish, clear acyrlic spray in a can, wax paste, PVA glue, something else? I even read about using baby oil - this cannot be serious?
Is there a quick cheap low labour guarenteed escape from the pin hole epoxy nightmare?
My guess is you used cheap billet foam and didn’t seal.
2 lb foam and higher, pressure molded, sealed, glassed/hotcoated in an environment with a steady temp… you should not have that happen.
But, what to do now? Bring everything in the house the day before… resin, board, sticks, brushes… and re-do. Sand down that old hotcoat, and lay the next one on thick. Everything has to be the same steady temp.
You must address this issue… those holes will suck in water in a big way.
before you re hot coat the board through some resin down and use a stiff squeegee and spread it around the hole board,you really want to work it hard into the board it will help fill in all those pin holes, then squeegee off all the resin then hot coat, hope this helps
Warm to me is over 80F...cold is anything under 70.....Yeah....Location matters............If you are glassing with epoxy......you are having problems because its too cold or too hot.....that's how it works.......
Mr Stingray did a thread on how to glass a surfboard.......with Resin Research epoxy......
...and Mr Stingray has a lot to learn.....Mr John Mellor is a wealth of information.....using diffferent products and glassing in not so perfect conditions.....out gassing on a fin install with EPS foam.....yeah, it happens.....
Pinholes in Epoxy Again.....work it slow and steady....no stress....no pin holes.....
Howzit I think the problem started with putting the hotcoat on the lamination coat and you can throw a second hotcoat but don't brush it on but use brush,use a squeege to spread the thin force the epoxy into the pin holes and you haven't really added any wieght but sealed the holes Aloha,Mike
The bottom of your board looked like the bottom of my board that was built with EPS and Epoxy in 1994. For repairs I worked a thine coat of resin into the pinholes and let it set then sanded it off. For the most part pinholes were filled. I still have a problem of gassing. The eps blank soaked up moisture and in the heat the steam needs to fins an escape. So I have had some mini Volcanoes erupt on the surface were so repairs were made. Thanks to the good people here on Sways I think I am onto a fix for the Volcanos.
Hi, you say KK on Pu blank, so no problem of gassing. I think you squegge to hard your lam so it introduce bubble. People that use PE resin usually lam dry with epoxy because they push resin through fiber instead of let it soak. With epoxy let resin soak in fiber then squegge it firmely in one shot to avoid foaming and not to dry. Hotcoat with squegge first then brush.
After the lamination, I do a seal coat, and I use a small squeegee and force the resin into the lamination. I’ll only do the middle part of the board that is not going to be lapped. Then after I lam the second side I do the same, but I’ll cover the rails.
I’ve found that XPS foam is the worst for getting pin holes, but since it’s not supposed to suck water I don’t worry.
I’ve also adjusted my lamination technique to keep the board wetter longer, then pull out resin after I know it’s had a chance to get into the cloth. Slow cure is great for giving you more time. Too dry on EPS or XPS will cause pin holes.
For color lams the pin holes may show, so you should probably use the same color when you force the resin into the pin holes.
I'll just come out and say it....You are a poor glasser and have a bit of learning to do. You'll get better, but there is a learning curve to all this.
1) when you mix your resin...don't froth it...don't make it all bubbly. Just fold it into itself. And do that for a long time.
2) Get the epoxy out of the cup and on to the board fast...get all of it on the board. Get it thin. Then you'll have plenty of time to work..even with RR on a hot day. If it stays in the cup then it speeds up...then your in the situation you mentioned..And epoxy will not be forced into cloth. Epoxy needs time to saturate into the cloth. That's where you messed up.
3) work it slowly
4) Don't pull the cloth so dry. In the picture you pulled it too dry. Think of the glass as a sponge....got that in your head? ok...So you have a dry sponge (thats the glass) You pour epoxy in the glass (wet Sponge now). Now you wring out the sponge (lamination). Ok so what happens if you squeeze out all the water out of the sponge..yep, it pulls in air. Glass wringed out too much, pulls in air...aka pinholes. Learning: on your first few boards. keep the lam a tad more wet. Once you get it wired you can start to pull out more material.
So what you did was apply stiff, bubbly epoxy, to an over worked section of glass.
Fix it by cleaning out the dust from the holes with water, or a brush..something to get the dust out. Then apply epoxy that is warm and thin as a gloss coat. watch you sanding so you dont expose any more of the little buggers.
Dave, I’m curious about your comment. A lot of people here rave about Add-F, but you say to not use xylene-based additives. What do you think is the problem with them?
(For the record, I’ve only used Kinetix until now, but was intending to try RR + Add-F soon, since everyone keeps banging on about it).
i find in the surfboard making game people use what makes things easy… often not what gives the best product…
xylene and parrafin wax makes it easy to get a thinner flow coat, the resin runs nicer and the parrifin melts when sanding to give some lube and make it seem to sand better…
but what does xylene do to the structure? at a moleculer level xylene never becomes part of the epoxy chain, so when it evaporates it leaves little microscopic pores and holes all over the then solid resin.
like religion you should never just believe what your told or just read… you need to find out the principles, mechanics and science behind it…
Followed advice and squeegeed resin into holes - (they are all the way along the left side of the bottom for some reason - too much sanding there?) squeegeed off excess, let it dry, sanded. The holes appear to have filled but you can still see them underneath. Not too attractive but the board is functional.
Hopefully I have learnt my lesson for next time.
Will have to see what my mate thinks of his board when he sees it.
Heck, I've had the EXACT same thing happen - even with polyester resin over polyurethane foam so I doubt it has much to do with the resin.
I think Mr. Resinhead got it right with #4. You pulled too much resin off with your squeegee. On boards the pinholes became apparent on after pouring fillcoat resin, I've had pretty good luck (on single layer laminates) by spreading out the resin and 'stabbing' the pinhole areas with the end of a paintbrush before final brushing. This method has not been so effective with multiple cloth layers. The cheater coat applied immediately after laminating usually seals them up too if you notice them in time.
Depending on lighting they can be very difficult to see and sometimes don't show up until the resin has had some time to drain or soak in to the foam. Sometimes holding your hand up and creating a shadow will help reveal them.
Now that you have them, blow the dust out, maybe open them with a pin, then recoat and squeegee resin into them. As mentioned, dropping temperatures would be ideal.