ok its time to try and glass with some resin tint!
Ive been through the archives, and it seems most of the topics cover doing swirls or one complete colour.
Im looking to do a 'two-tone' old school twinnie. Id like to colour the resin in one colour in the back 'third' of the board, and then another colour for the front 'two thirds' of the board. Id like the colours to wrap around the bottom and the deck....also dont mind a little bit of colour mixing where the two colours meet.
Ive seen a few boards, mostly mals and old school numbers getting around with this sort of two tone effect....any suggestions / tips on the best approach!!
Im using UV resin so have plenty of time to have two colours mixed at the same time etc etc!!
Is it going to be easier to just do the bottom in colour, using cut laps, with a clear deck.....or is it possible to have the colours go all all the way around the rails and onto the deck>>>>any dramas likely to occur here, i.e doubling up of colours on rails??
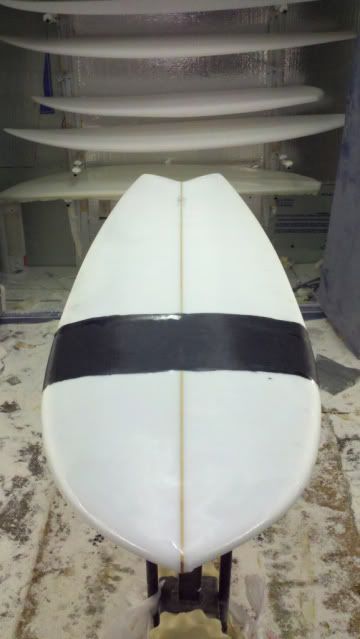
Below is a photo (owned and posted by eddy, Cambridge MA, USA) that is very similar to what I'd like to achieve....but just using two colours as mentioned.....
Hey Marty. My tint experience is limited, but if I were going to do a board like the picture, I'd just do the bottom, then flip it and do the same on the top. With cut laps. Yeah a little darker color where the rails lap, but no biggie, it'll look fine, I wouldn't overthink it, but that's just me. I have a tendency just to dive in and do it. More knowledgeable sages will come along soon.
I would pour and spread the clear first, then I'd pour the red along the junction, and squeegee away toward the tips. Using a different squeegee for each color, careful not to get 'em mixed up!
i would probably just stain the foam. tape the apex of the rail. pour, spread and pull. flip and do otherside. If you want a clean line of separation tape off and do individual colors, if you prefer an abstract line or a bleed effect simple don’t tape and allow the human factor to kick in, and get some desired chaos.
+1 on the stain route. If you don’t know what that means; use resin like paint on the blank. No glass. If you are quick enough, you can use one pot. That way you can match the deck and bottom colors much better.
We just did a tinted resin band in our shaping class.
Cut the fiberglass laps hanging down to the midpoint of the rail to determine your color separation and lay the tinted resin down with some delicate squeegee action at the edges.
Kensurf’s squirt bottle method will probably give you a cleaner line than we achieved here…
Did this a few days ago…although not a triple pour…I pretty much did the same approach as ken mentioned (sans the squirt bottle). Sorry for my laps…I can barely see straight when dropping color let alone cut a nice lap line…
not a bad finish at all there, thats exactly the sort of thing Im trying to achieve!!
one query....is it two tone on the deck also, or does the two tone finish at the cut laps on the deck??
so the way im thinking is;
use cut laps
mix both colours with a litte mekp to ensure kick
pour both colours onto bottom in a line across the board to form the line where the two colours meet.... 'colour junction'
using a different squeegee for each colour, pull the coloured resin away from the 'colour junction', then finish pouring and spreading resin over the reast of the board
can do exactly the same procedure on the deck if I want the colour to flow around the rails and up onto to the deck....or can do the deck in a clear.
Im happy if there is a little mixing/cross over of colour, I think that can be kinda cool and arty!
Good tip from SDREPAIRMAN, I will add some catalyst as well as UV to ensure (I usually doe for under the logos etc!)
Hey GREENLIGHT any chance I could get you go over this bit....
"Cut the fiberglass laps hanging down to the midpoint of the rail to determine your color separation and lay the tinted resin down with some delicate squeegee action at the edges."
I'm thinking you suggest this as the vertical 'cut in the lap' will allow me to wrap one coloured lap first, then wrap the other coloured lap i.e. either side of the verttical cut in the laps that are hanging down!
Thanks everyone, I think I'm gona give it a go....hell what could go wrong!
yup…dipped on the deck as well…however, I poured one color at a time…dropped the black first and then poured the orange. Pouring two lines…will work as well…make sure to post that sucker up once finished…good luck!
If you want to lock your color down. Pour a bucket of clear resin over the top of the color work.
So if you are trying to get that clear board with the red bands. Do the work in red, then flood the rest of the board including the red with clean. This will lock the color down and you won't get any muddied lines, or rails.
This also works if you want to do resin patch work,small lines, or boxes in colors..ect. do the color work, then flood the board with clear resin. it might seem like a waste of resin, but it's the only way it will lock the color in, and get crisp color break,
Hey, I’m looking to do this same split tint lam on both deck and bottom. Does anyone have any input on the following method: say I’m using orange and gray. Apply line of gray and pull back to the tail. Laminate the entire tail in gray, wrap the rails with the cut lap idea to separate color on rails, and then let the gray kick. Then come back after gray has kicked and tint the rest of the bottom to nose orange, wrap rails and let kick. Then do the same on the deck. Any problems with breaking the bottom or to lamination process into 2 phases?
How would a (moon tail) respond too a deep trough bottom turn driven by a single fin ,considering that a single fin has the tendency to slide sideways within the trough has the water drains out beneath ones feet in response to the occurring developmental dynamics . First thought to consider is the fin depth and base width but in terms of a vertical pivot response would the end point on the inside edge of the moon tail promote less slippage and more accuracy for board length 6.0 and under . All holding true lines to the single fin configuration.