brings back memories of Hicksy’s shed, from when I first met him … [ like some kind of mad scientist in his lab , surrounded by all KINDS of wood working gear …]
thanks , I really like the step by step photo threads ! The main reason I come to Swaylocks on a daily basis …to SEE what people are doing / making / riding! (I’m more a visual learner , and it’s great to see how people do stuff . )
I like those shaping stands …a solid bit of wood , much easier and more sensible [and accurate] than the metal I mucked around with for mine .
cheers Hicksy, yeah well we’re just Aussie’s doing what we do best, making do with what we have in our “come-in-handy” piles! Under my house is FULL of come-in-handy’s!!!
more pics to come as soon as I decide on my rocker profile and get into it again.
Nice bit of jigging there Robbo, better than my old wardrobe (my “it’ll come in handy” pile) jig that I’ve used for all three HWS’s so far. As for your clamping, you just can’t beat gravity can you!
after MUCH reasearch and deliberation I finally decided on a rocker profile, here’s me cutting out the stringer with jigsaw and then smoothed out with hand plane and sandpaper.
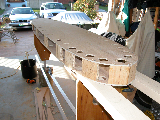
marked cutouts for the stringer to save on weight, also for attatching the interior rails using something like a halving joint.
finished stringer on top of the jig ready for the next stage.
forgot to add a pic of a little disaster that took place while lamming the first side of rails together, this is what happens when you leave your box of epoxy gear in the sun for 4 hours and then mix up on a 28C degree day!!! (90F) it started smoking and turned purple in about 2 mins! had just finished the last of the rail before this so the board was not affected… THANK GOD!!!
getting all exciting now innit? Your intrnal rails look good, no spring back when you unclamped? Mine sprung out loads so needed re-bending around the frame after I took them off the box. Looking really good so far.
Do you want pics of the contraption I came up with for laminating layers of wood/plywood? Perfect if you are using Gorilla Glue, eliminates glue lines, you know the way it expands?
Here you go, cost $23.00, the steel was scrap, the plywood was a left over, two layers of 3/4" on the bottom and on the top, all I had to buy was 5/8" threaded rod, washers and nuts.