Hey everyone I have a skil 100 that has the small of the two dust chutes. I was wondering if anyone knew of how to get ahold of the taller one or anyone had a plans on how to make your own? I have seen plenty of shapers that have just made their own but i have not a clue on what they made it out of or how they did it.
Not sure if this will help. I wanted to connect the Skil to the Clark slinky hose. Made this out of a plastic hose barb fitting and a piece of acrylic.[img_assist|nid=1057059|title=skil 100 dust attachment|desc=|link=none|align=left|width=0|height=0]

clever, Huck. what diameter for the nip? and where do I find one?
It's a 1.25" PVC barb nipple cut in half. I think I got it at the local Ace Hardware. The brand on it is Spears, but I think they must be made by many plastic companies.
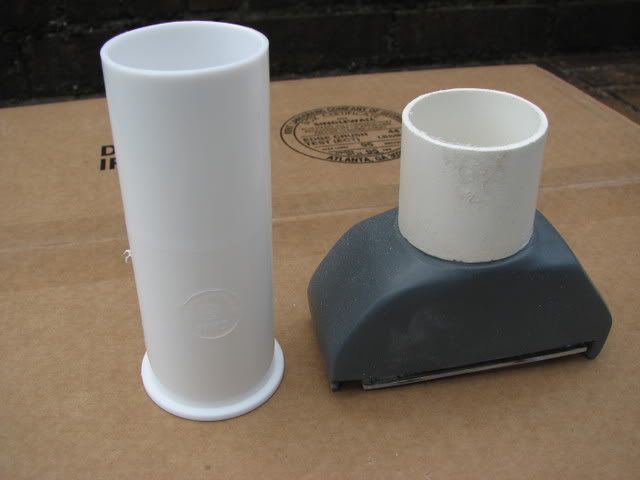
At Lowes Home Improvement in the plumbing section you can find some plastic pieces that are the perfect fit for the Clark type slinky hose. I think they are for sink drains. They have a lip on on one end and are cheap. Attached is a pic that shows the plastic piece and one of the type I make. Ian Zamora and Josh Miller use them. I can provide details on how to make them.
For the original question. Might take a pic to a sheet metal shop and they can probably bend one for you.

Regards, Dave D
I was thinking about make a chute that would connect to a dust collector, the biggest problem though is finding a piece of sheet metal or acrylic that will fit in the slot.
MGBut, You can make a chute out of uncorrigated cardboard like the back of a legal paper pad. A pair of scissors and tape to make the pieces and once put together, wrap in wetted out 4 ounce. When it is set, sand/grind to detail, seal the inside with thinned epoxy and you are there. Make a few while you're at it. You can do it all out of scraps.
I used a piece of acrylic from an old picture frame. It was a little too thick, so I beveled the edges with a file. I meant to paint it to look purty, but never got around to it...
Dave, how did you make the bottom part? Please share the process, thanks!
Here goes:

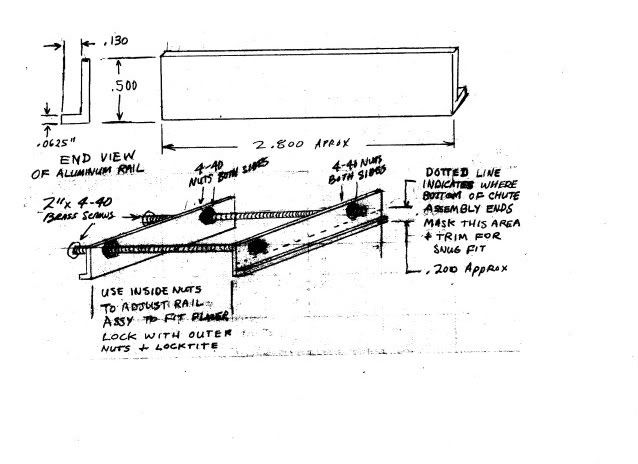
The rails are made from 1/16" x 1/2" x 1/2" aluminum angle. I found mine at Lowes but hardware stores and hobby shops are other sources. A small cut-off wheel like Dremel makes or something like the Fein Multimaster or equivalent comes in handy to make the cuts required. Clamp the rail pieces together (back to back) and drill holes for 4-40 screws. Something like about 1/2" to 3/4" in and near the top of the rail pieces so as to not interfere with the planer body. Clamping the pieces will keep the holes in register to achieve good alignment of the rails. Cut the short sides of the rail pieces so that they will fit into the grooves in the planer with a bit of clearance between the planer body and the outside of the rail. Use 2" long 4-40 thread screws and nuts to hold the rail pieces in position to fit into the planer. Adjust the fit into the planer with the inside nuts and lock it into place with the outer screws. Using locking nuts on the inside is an option. You should be able to slide the assembly in and out of the planer. Use some scrap p/u foam and make a block to fit between the inside of the rail pieces and provide the shape for the collection area. The width needs to be equal to the width of the planer body at the exhaust port. Fit the block between the rails and over the screws. Sand the block to shape with a flat area on top to accept the hose connection. Rough up the hose connection and tape off where the glass will end. I usually put a couple of layers of glass on the top of the foam and set the hose connection into this while it is still wet. Then subsequent layers of glass enclose the flanged end. Before glassing the rail area needs to be masked from the dotted line in the drawing down. The bottom of the glass needs to be level and mate with the top of the planer exhaust port. After glassing you can carefully cut down to the tape edge masking the rail pieces and clean up with a small file or sandpaper. I make mine to be installed from the right side of the planer sliding toward the left. The right side of the chute needs to hang down low enough to land flush against the planer body when installed. It will also need a relief cut to fit the curved area of the planer body. The left end will have to be trimmed to fit into the planer and end up directly over the left wall of the planer port. The chutes usually fit tight enough to not need any sort of retainer just relying on the interference fit. I probably end up using about 4 layers total of 6 oz with uv poly resin. At some point you trim the screws from the inside and scrape out the foam with a screwdriver or whatever. Grind out the glass over the hose connector and smooth up the transition. You can add a couple of layers inside over the exposed nuts to provide a smoother flow if you like. It will be interesting to see what others come up with. So far I don't think there have been any problems with clogging. If you are not using a vacuum system this approach should work to make a version of the original chute.
regards,
Dave D
At Home Depot or Lowes you can buy a shop vac attachmentt that goes from flat to circular, The flat base maybe too wide or long, but can easily be cut down to fit a Skil. It can be found in the attachement acessory/ section by the shop vacs. Pretty simple. I have seen a few shapers using them. They are nothing more than a hose attachment. If that doesn't work for you or is too simple of a solution; please feel free to over-engineer at will.
Thx, Dave, very very helpful.
Dave-
What is the gray piece in the skil 100 planer dust chute? I love the design of this and need to make one very badly. Any tips would be appreciated Thank you-
Erik H.