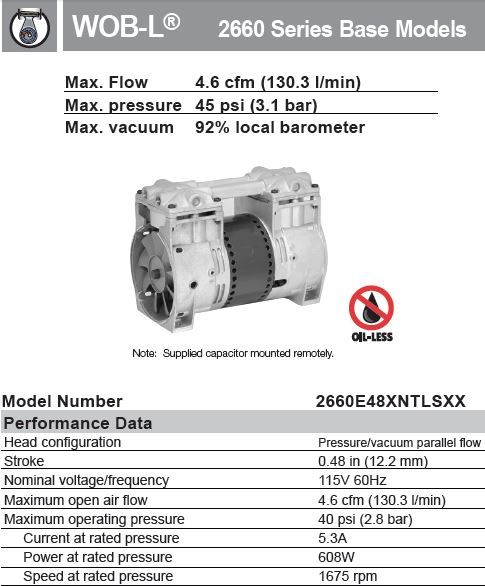
After a few weeks of monitoring Ebay and CL for a good used GAST or Thomas pump I finally decided on an opportunity to buy a used Thomas 2660 pump from Ebay for $55 plus $15 to ship to Hawaii via USPS. The pump is oil-less piston type of pump capable of 27 Hg max and 4.6 CFM. And from the amount of listings on Ebay and internet info, it looks like a popular and well supported industrial grade pump.
My pump setup was based on joewoodworkers.com DIY EVS pump build that was referred to on several posts here at Sways (Mahalos). I ordered most of the brass fittings, vacuum valve, MAC valve, filter, and regulator guage online from their website. The rest of the parts I sourced locally from leftover parts I had on hand and visits to Home Depot, Ace Hardware, and a local plumbing supplier (Central Supply). After reading through the instructions a few times and confirming I had all the parts on the checklist, it took me a couple days of working around honey do’s (and a surf session) to finish my vacuum pump build.
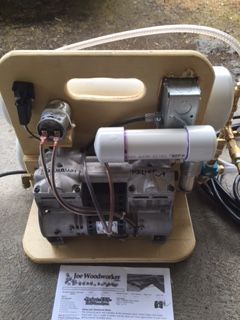

After the build, I started up the pump and by default reached 5 Hg’s of vacuum pressure within 30 seconds before the vacuum switch cycled the unit off. I was able to increase vacuum pressure to 20 Hg’s by turning the adjustment screw counter clockwise on the vacuum switch. After a few well-spaced vacuum adjustment and power cycles, I was able to maintain 20 Hg’s(16 – 20 Hg’s) for over an hour before cycling back on. Not sure how long exactly since I ended up getting tired of waiting in the garage and went inside the house to have a beer. I heard the unit cycle back on for about a minute before shutting down again after reaching 20 Hg of vacuum. From my living room next to the garage, the noise level didn’t seem excessively loud at all. Standing next to the setup, the noise level is definitely not more than what my 3 gal Porta Cable pancake compressor makes when it cycles on. I’ll be working with #1 and #1.5 EPS and so amount of pressure should be much less than 20 Hg. I hope! I’ll have to perform a dry test run before mixing the epoxy. The joewoodworkers inspired design is easily stored on a standard storage self (13” x 14” footprint). The entire setup (minus the hose) ended being 35.6 lbs. After adding all the parts, it costs over $300 build. Note, I added the purchased of a drill bit ($12) and ¼ NPT tap ($12) Ace Hardware Hawaii. And since I didn’t have access to a spare air tank, I also added the purchase a 20’ section of 4” Schedule-40 PVC pipe ($73) from Central Supply. So I have extra anyone is interested in some PVC pipe or drilling out a ¼ NPT treaded hole – let me know. It wasn’t a cheap build, but I’m more comfortable with the industrial-ness of the build. More so, it’ll replace a manual pump I used to bleed my car/truck brakes. And there’s a chance I could use the setup for veneering my cabinet doors and vacuum chucking. So it’s turning into a multi-function tool in my household.
Will report back after my first vacuum bagged surfboard experience… Shaka \ooo/