As everyone above pointed out, this is awesome. One of the coolest things I have seen in a long time.
Really, it could change everything.
Have you surfed it yet? Any comments? Can you compare it to any similar one-piece boards?
Looking at all the different things people are trying now with perimiter stringers and carbon inlays, the tubes as you have them might help ride quality in some ways.
How much weight did it gain?
How was the actual sawing in half ? Any special blade needed? Was there any splintering of wood or glass or chipping of foam – cleanup needed to get the faces flat? How does the fingernail test do on deck and bottom near the split?
OK, here’s how I built my tubes in order to retrofit my tri-parts board. There are probably some more efficient or easier way to do it, but as usual, I used whatever I had available : some EPS cylinders (friends at atuacores.com gave me these) and 1m² of 6oz carbon fiber leftovers.
First step was to hollow out the 3 parts in order to insert, align and seal the 4 carbon sleeves. This has to be quite precise and is a bit tricky to do as you need a fairly close fit so that you don’t use too much resin when you’ll seal the sleeves (inner tubes). On the other hand you also need a few mm gap so that you can adjust the sleeve in order to get a perfect alignment.
I used 3 tools for that purpose :
a hole saw to cut through the face plates
a rigid cardboard tube with a taped on hole saw blade to cut deeper
a small router bit adapted on a drill + extension in order to clean up the inside
When making this tube system I tried to get the maximum tube diameter I could fit in the board. To make it even stronger (but that’s probably overkill), using a screwdriver, I routed the cylinder holes until it connects with the top and bottom skins. Then I inserted balsa sticks. This way, the tubes will only rest on the top and bottom skins and on the PVC face plates (no risk to crush the foam over time due to regular tension on the tubes).
Now comes the buidling of the tubes. For this, I used some EPS cylinders, some 6oz carbon fiber, 2oz fiberglass, cheap tape, wax paper.
The process went as follow : eps cylinder is wrapped by several layers of wet fabric. The tubes are wrapped with carbon (3 layers if I remember well) then 1 layer of 2oz glass for a smooth finish. The inner sleeves have the same amount of fiber except that the 2oz are on the inside part.
The fabric is precut and taped together so as to make one single piece (the paper tape saturates with resin and wont be removed).
Carbon fiber fabric easily destructurate when you cut it in small pieces. Therefore I first taped the pieces I wanted and then cut through the tape. This way, the fabric stays in shape.
Now I put a layer of wax paper on my table, then lay down my piece of carbon+fiberglass and saturate it with epoxy. Then I roll the fabric onto the eps cylinder. I’m using the wax paper to help me roll the fiber and I peel it off as I roll. The cylinder is longer than needed so that it’s easier to process and so that you can let the whole thing cure resting on the edges.
Once cured but not too hard,I cut the tubes to the proper dimensions. Once totally cured, I only had a very light hand sanding to do.
On the picture, you can see th first tube already laminated while the second one is ready to be wrapped once I’ll have wetted the fiber.
Now comes the building of the 4 sleeves/inner tubes. These were built one at a time, using the corresponding tube as a mold.
For the system to work, you need a close fit between your tubes and the inner tubes but not too close : a small gap is required so that the air can exit/enter the sleeve when you disassemble/assemble your travel board.
On my first try, I put greased the tube with vaseline (I don’t know the english term for that) and laminated around it. The result was to tight that I had a hard time getting the part off the mold and and then once I closed one end of a sleeve I could no longer insert the tube more that a few inches because the fit was so perfect that the air inside would just compress but not escape.
On the second attempt, I wrapped the tube with one layer of wax paper. Then I added another layer of wax paper in a way that it would freel turn around the underneath layer (for easier removing of the mold). These two layers of paper gave me the necessary hairline space but still a close fit (makes that “tooomb” sound when you get the tube out).
And here’s the result :
Inside, you can see the tape trapped underneath the 2oz fiberglass
Last step is to seal the ends of the tubes and one end of the sleeves.
I removed a little bit of foam on the tips of the tubes (about 2mm) :
Then, I prepared in a disposable plastic cup a few grams of epoxy+microspheres, filled the top of the tubes and sank the sleeve in the remaining resin in the cup :
Pierre, despite I think it’s better for structural stregth of the tubes to be filled with something (EPS in this case), I must say you could make them hollow just pouring styrene or acetone over the EPS.
Just keep on an open space!!! Melting vapours are quite bad.
Great stuff pierre, thanks for posting that up! I had read about a similar process on the solar composites website, but they only talked about making an outer tube using an inner mold. I was trying to figure out how to make the inner part. I’m still wondering though, what kind of tolerances did you get on those inner rods? It seems like with a hand lamination over a eps cylinder it wouldnt’ be perfectly smooth and cylindrical the whole way. Any trouble with that? How did you get a perfectly round and smooth finish on that?
If you pre-wet your cloth and wrap up the tube very careful, then pull a little bit on the cloth to tighten it then you get a nice a regular tube. Ending up with a 2oz cloth means that there is very little sanding to do to get a nice smooth finish.
Of course, one slight difference in the way you wrap and tighten the cloth or in the length of the cloth itself will give you a different diameter but it doesn’t matter since you’re not trying to make a tube that precisely fits in a given sleeve but instead you’re going to use the tube you built to serve as a mold for the inner sleeve.
Now I remember where I got this info : US patent 5711692 (the bisect patent). It says that “given the same wall thickness, the stiffness of the tube will decrease in proportion to the cube of its diameter.”
Further it says that “in the tested embodiement using an aluminuim tube with a 0.049 inch wall thickness, the overall diameter of the tube assembly could not be reduced below 50% of the thickness of the board… on the other and it is believed that tubes made of stiffer materials and or having thicker walls could employ even smaller diameters, perhaps 25% or less of the board’s thickness”.
ive been watching this thread theme since i joined sways about 2 years ago and its constantly been in my mind as a future for enviromentaly freindly surfboards. lets face it the plastics we use at the moment work and last and until the ‘bioresins’ get real good we are better saving the environment by reducing our travel carbon footprint, ie less surfboards on roofracks on the way to the beach!
anyhow ive been working on a system which is not massively dissimilar to your systems or that of the pope bisect. i am not into stepping on anyones toes at all so if i am just say. id like to offer a service where i retrofit customers boards with my split system and build them a custom travel case. this is not intended to be a mass production operation, im talking maybe a few boards a year to start.
if this does not sit well with you guys just say and ill keep it to my own boards (if thats still ok)
I just wanted to update this in the name of good research, especially since I probably get more questions about this particular project than anything else I’ve done on sways.
In this particular case, two 1/2" carbonfiber tubes failed catastrophically under the force of a falling lip. I repaired the damage and retrofitted it with a 1.25" aluminum center tube housed in a carbon fiber sleeve, and left short extensions of the 1/2" tubes as alignment pins. I chose to do it this way because I knew that aluminum was strong, that having been Pope’s original choice before having started using custom-made carbon tubes, and because I happened to have some aluminum tube on hand.
I prepped the aluminum tube with mold release and PVA, then put on a couple of sleeves of lightweight fiberglass from solar composites to give a good interior finish. On top of that, I spiral-wrapped three layers of carbon tape in alternating directions, and smooshed it all down with packaging tape spiral wrapped end to end.
Demolding was a real bitch, I had to shrink the aluminum tube using ice and salt to get to move at all, and I still have tendonitis from wrestiling with it for about 45 minutes. There’s got to be a better way than that. Then the fit was so tight that I had to mount it on my drill and spend an hour sanding a polishing the aluminum to get it sized down to fit easily in and out of the tubes mounted in the board. But now fit it does, and the lesson has been learned.
I also retrofitted my first two-part board with an aluminum tube in anticipation of selling it.
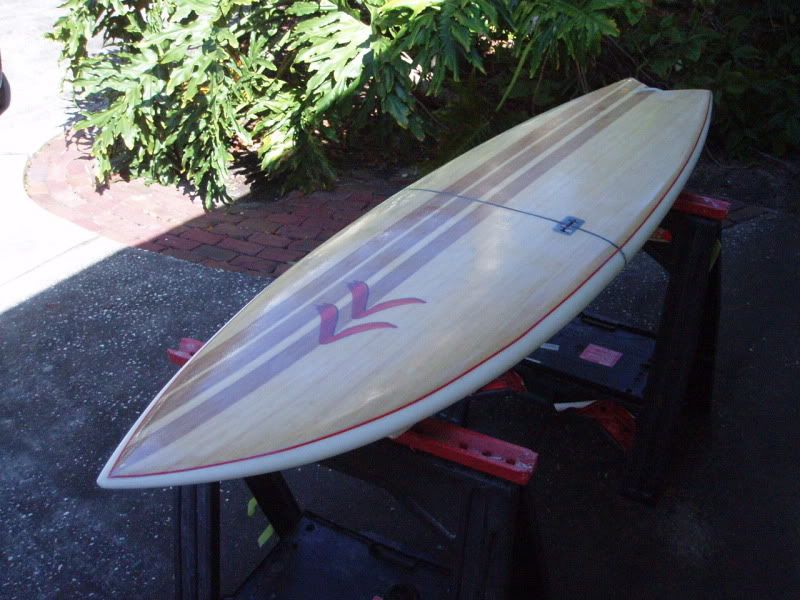
Here is a ride report on my first two piece. I just got back from 4 days in Costa Rica with it and thought it would be helpful for those contemplating one of these to know some of my experiences. First, I sailed through baggage with no extra charges on American. I was very smug. Not even the $25 charge for the first bag. I think on international flights that charge is waived. I bagged it in an oversized bag folded in half and duct taped to hold the two halves together. Also, the bag was a little oversized, but the desk agent didn’t even consider measuring or ask what the heck it was. All good. The waves ranged from waist to occasionally OH beach break. Some outside big mush and some hard hitting inside shorebreak. A pretty good workout for the board.
Here is the board, more shots on the 'The new what are you working on" thread
The board worked well. But to be honest I could not get the two bolts, which were supposed to draw the two halfs together, tight enough to suit me. There was just a little play in the two halves, which was annoying. I also found the allen head bolts were a little weak. I damaged the head on one and was concerned that I might not be able to get it apart for the trip home. The board has two 3/4 carbon rods and the face plates are 1/8 ABS. The bolts were tightened up pretty snug. The fit on the rods is very very tight. More tight than my 9-6 Bisect LB. I am going to modifiy the board by changing the bolt system. Not sure what I will do, but I am very close to a satisfactory board for travel. The key is a snug fit with the two face plates held firmly together.
There is a lot of potential here, but this needs more tinkering. On my next one, I may consider cutting the back half a little long so as to get my front foot behind the cut.
Jarrod is right about a larger tube. Strength increases exponetially with the diameter. But I wanted two tubes.
All and all, I am glad I took the board. Airline fees are a painful ripoff. I saved $200 on that alone.
If I go down this road again I’ll make my own tubes. The photos show how a compression joint ended up working. One fin box nut is drilled out to act as a washer. The material between the ABS is a very thin layer of neoprene. The basis of the joint is a long board fin box wrapped in Dcell then embedded in the board and overlapped with the veneer prior to cutting in half. This is my kite board. Yes, I know my finish skills suck. The yellow “bondo” micro/epoxy fill on the rail is to compensate for having melted the EPS under the rail by leaving the board under clear plastic on a hot day to post cure. Turns out, the plastic needed to be opaque. When I cut the board in half I used 2# pour foam to fill in the void. The pour foam did not expand the rail back to the original shape, so I filled in the dip for good water flow (around 1/8" at the). Thanks to all who answered questions. The surfboard handled some thumping lips that I didn’t make at Honolua Bay on Maui. I was stoked to see it in one piece each time I eventually came back up. Keep having fun.
[img_assist|nid=1054881|title=beach chair before base|desc=|link=none|align=left|width=100|height=75]
Those are the very ones Mr. Chrisp. Thanks for picking up where I left off. As you see, all they take is a drill to install. The 1/4 bolts I would say are strong enough since a 16d nail takes 600 lbs. shear strength. So, a 1/4" zinc bolt will go at more than triple that.