Epoxy hotcoat sanding advice needed

Hi,

I’m a first-time builder, long time lurker from Germany and now I could need some advice regarding hotcoat sanding (epoxy). I searched the archives but found nothing match my questions exactly… (many threads are also no more accesible, but I guess you know that).

Backround info: My first board is a 6.10’ x 23’’ x 3’’ round tail, inspired by the Clark Foam cataloge and Fatum Surfboards from Portugal. The core is 2 Ibf³ eps with a pinewood stringer (not sealed). I glassed the board with epoxy resin and 1x bottom layer, 1x top layer and a deck patch (all 7oz. e-glass). Hotcoat resin without any surface agents.

Now to my questions:


1) I powersanded the hotcoat, starting with 120 grit on the foam pad at 1.000-1.200 rpm to get rid of the shine (I want a matte finish, no glosscoat). It went quite good, besides several little spots remained shiny (looking like a leopard pattern, see photos) though I was sanding an hour or more per side. Clearly these are uneven spots which are most likely existing since shaping the board. How would you go on? Since I started with 120 grit I’m considering going down to 80 to get it real even (remove the shiny leopard pattern), then going on with 120, 180, 240, 320 and stop.

This would probably lead to some sand-throughs (already got one sanding the leashplug down with 80 grit and no pad, just the little flexible rubber pad,). But after touching the sand-throughs up with little resin, it should be easier so get it smooth, or is this not a good idea? With sand-through I mean visible cloth texture, no foam (see photo).

On my next board, I’ll seal the core and hope this and my now gained experience (work clean on every step) help to eliminate most of the uneveness.


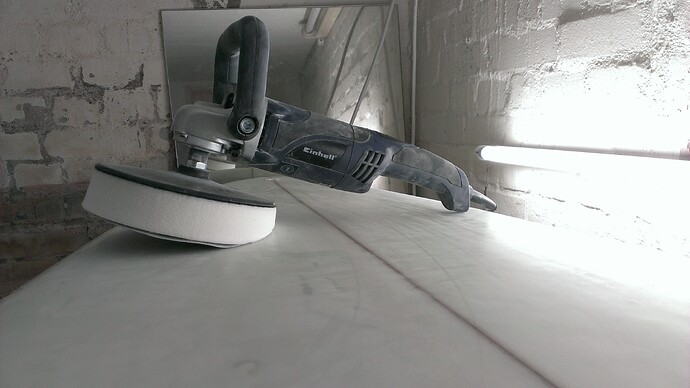
2) My powersander (photo) has a rpm-range from 1.000 - 3.500. Am I going too slow with 1.000-1.200 rpm? Also the sandpaper clogs a bit. Little spots on the sandpaper from hardened resin dust. Does this come from too much pressure?


3) I did a touch up with a small batch of resin. The resin hardened with trapped bubbles (see photo). Do you guys have a good tip of how to mix resin with lesser air bubbles?


Big thanks in advance for any advice you can give a bloody rookie! :slight_smile:


Greetings from Germany,

Gordon_Shumway


I would put small piece of glass on the low spots to bring the level up flush with the surface - this is what I do when doing ding repairs. Sand and blend when dry. When mixing resin go slow smooth and steady to avoid bubbles and froth - and don’t put squeegeed resin back in the mix as you go. But I’m just a backyard shade tree builder so might want to see what the experts say.

Here is something from a different thread.  Oh, and you need more than one 4’ light to see.


Ok, here we go.

  1. Cut laps are better than free laps.  Do the cut lap when the left over epoxy in the bucket and squeegee is no longer sticky.  The epoxy will be still really soft.  Easy as resin.  If you wait until later, you will be hating life, and will probably cut your fingers as you force  the razor.  If you waited too long, use a vix file, or sand through down to the tape.  Much harder.
  2. Fiberglass Hawaii Thick and Fast hardener for basting laps, and rails. 
  3. Fiberglass Hawaii Thin and Fast hardener for all your hot coats.

My order is

  1. Laminate one side with slow hardener, and do your cut laps
  2. Baste with thick and fast only at the laps and paint thin on the rails.  Watch for drips.  Knock them down. 
  3. Laminate the other side with slow hardener.  Cut lap again.  Cut on the round part of the rails.
  4. Thick and fast at the lap again.  Watch for drips.  After it hardens you can sand a bit, but don't sand into the cloth.  No matter what, if you kiss the cloth while sanding, **STOP SANDING**.
  5. Masking tape to prevent drips to the other side.
  6. First hot coat.  **NO SURFACING AGENT!!!  **maybe a little zylene.  5% by weight.
  7. Flip and do the other side.
  8. Sand with a sanding block.  **STOP SANDING WHEN YOU EITHER GET AN EVEN LOOK OF SANDING MARKS, OR YOU KISS THE CLOTH WHICHEVER COMES FIRST.**
  9. Do another thin and fast hot coat.  Add 5% Xylene.  **NOSURFACING AGENT YET!**
  10. Do the other side the same way.
  11. At this point you should have a pretty good looking board.  Pretty flat, and maybe you touched the weave again in only a couple of spots.  You can stop now, or if you want a real pro looking board,one more step.
  12. Last hot coat.  This time add 5 to 10% xylene, and 5% **Fibrglass Hawaii** surfacing agent. ** NOT ****RESIN RESEARCH SURFACING AGENT.  DIFFERENT COMPANY, DIFFERENT STUFF.**
  13. This last coat should look pretty good.  Sand lightly with  320, just to knock down any zits.  Sand to uniform.  Use a **vibrating** sander at this point.  Look up **Porter Cable 505** sander.  My new best friend.  **No Hand sanding**.  (Makes Scratches) **No Disk sanding**.   Don't try to gloss polish.  It wont.

In his video, Greg Loehr suggests using a rattle-can satin finish, water-based polycrylic, as a final coat option over the sanded smooth (final grit 150) hotcoat.  But I don’t think this will get quite the matte finish you may be after.

McDing passed on this pearl for a matte finish:

After sanding the hotcoat smooth, use Behr Low Lustre Concrete Sealer (water-based polycrylic), apply with lambs wool, stain pad or Shurline Handi Painter – Herb Spitzer suggests using a sponge to apply.  Apply a second coat.  Be sure to knock/wipe off small drips along the rail before they dry.  Then use the finest Scotch Brite pad available (Gray ultra-fine is the finest I could get) under your orbital sander to get your final matte finish.

McDing indicated the Behr Concrete Sealer could be sprayed also.

BTW for this method, I sanded first with 100 then with 150 to as smooth and hazy a finish as I could get without burn throughs.  Then for the few small glossy patches remaining, I decided to just hand sand them with my finger tips to remove the gloss and prep the surface for the sealer.

I will be applying the Behr Concrete Sealer today and tomorrow for my first try at it.  I plan to try a fine pore sponge, a foam brush and a Shurline Handi Painter for applying to see which I like best.

I find epoxy hotcoats very hard, especially on the first boards. Looks like you have some contamination in your hotcoat and maybe a not ideal temperature (I find 21°C works best with a heater blowing at boardlevel).

Here is what I do to make it work:

  • Room cleaness: remove all dust as much as possible a few hours BEFORE you hotcoat. Remove all dust from working clothes as well outside. Set up your epoxy kit BEFORE glassing.

  • Lay down the glass as perfect as possible.

  • Stable temperature.

  • Exact mixing and easy stiring of epoxy.

  • Clean new brush.

  • Stick to handsanding! You just need a wooden block and a softpad block. 


Seeing the spots I would opt to sand it down as much as possible and re-coat if you want to go for perfect. If you don’t mind, handsand out the shine as much as possible, wetsand through to 400 or 600 and go surfing.

That’s how I do it, but I’m only at board 6 …


generally, coarser sandpaper can run at higher speed on your sander, when you get to finer grits you need to slow it down or it will overheat.

THat’s a soft looking pad on your sander… ok for doing rails, but it is not going to want to flatten out the deck and bottom of the board very well.

get a firmer pad or do it by hand with a hard block.  Go to 80 grit if you need to in order to get rid of the shiny spots.

have fun!

swaylocks is amazing! thanks everyone for your fast and helpful input!

@huck there are too many of them to cover every spot with a piece of glass. And I think it might make it more uneven since the shiny spots aren’t much lower than the rest. But it’s hard to see on the photos. Slow and steady resin mixing against bubbles makes sense, thanks!

@everysurfer don’t worry, I got a bright light on the ceiling, but switched it off so the shiny spots are more visible on the photos. I did freelaps on this first one, b/c I think it’s easier…  I will certainly do cutlaps on one of the next boards.

@stoneburner thanks for your tip on getting a matte finish with water-based polycrylic (you mean polyacrylic right?) spray/sealer. But i hope after sanding with 320 grit the matte look without scratches visible will be reached. Or won’t it?

**@no_rocker **contamination definitely exists, although I vacuum cleaned everything after shaping, used new brushes etc. but it’s difficult to keep everything off the board while glassing (really small room). I’ve got a heater blowing before and after glassing which keeps the temperature at 25-28°C, but I switch it off when I’m going upstairs after I cleaned and put everything away (prevention of fire). My shaping/glassing room is in the basement, so it cools real fast after switching off the heater, but it gets not cooler than 15°C (even at night).

@keithmelville thanks for your advice! I’m buying a harder pad right now. You’re right, this will help to get the levels even.

Gordon,

I am just repeating what McDing has said here at Sways or what was shown on Greg Loehr’s Epoxy 101 video.

Greg Loehr used the Minwax Satin Finish in a spray can.  He did not sand it so not really a true “matte” finish just satin no gloss. I have it in a brush can for other projects.  The Minwax product says “Polycrylic” (water based) on the label.  I will assume it means poly-acrylic though.

The Behr Low Lustre doesn’t say Polycrylic on the label – says acrylic-based.  McDing said use the Scotch Brite pads (not sandpaper) to get the final matte finish with the concrete sealer…

Just tried to apply my first coat of concrete sealer.  It was a major disaster. Nice thing about water-based is you can still wipe it off with a wet rag before it dries.  The foam brush made for a foamy not so even coat.  The Handi Painter laid down a thick coat.  Sealer went on smoothest with the fine pore sponge. But it may have left microbubbles which I tried to smooth with the Shurline Handi Painter.   It left a few mini-bristles in the finish.  The sealer coat started getting tacky and attempts to remove bristles made big marks. Attempts to smooth marks left streaks. I got out my T-shirt rag, soaked it in water and wiped it all off.  If at first you do not succeed

(Just read manufacturers info on Behr sealer.  Do not shake before use.  I did.  Explains the micro-bubbles in the finish).

The fine pore sponge was purchased at an O’Reilly’s Auto Part store.  I may try it again after “dampening” the fine pore sponge with water first and then squeezing out excess water.  But I think I am going to go back to O’Reillys and by a pack of the "microfiber applicator pads for ultra-fine polishing and waxing – supposedly “gentler than a foam pad.”

A good sand job down to 400 grit should get you a matte finish.  I just want to go for a simple method that seals and gets a nice tough matte fiinish.  Apply, then smooth dried finish with Scoth Brite ultra-fine abrasive pads and an orbital sander.

For the sealers we buy the pads from harbor freight. 1.99 for like 6? as long as you wring them and wash them out when you are done you can get a lot of use out of them.


What type of pads?

If you are using a good uv resin such as resin research, there is no need to apply any kind of crap on top of it. Just wet sand to 400 grit and buff it out with a green scotch-brite pad for a nice matte finish.

those leopard marks or “spots” you ate seeing are the normal pattern left from brushing the resin on correctly. Your first sanding ( by hand if you are a beginner) should get all the giant uneven parts off and leave the spots i use 80 grit. move to a finer grit around 120 and get most of the spots to shrink. Next finer grit  200 gets just about all of the spots nearly out. Next 320 wet to get the last traces of spots. then move to 400 grit and the scotch-brite.

make sure you are removing all the scratches from the previous grit before switching down to the next grit. Use the spots as a gauge to see how much more sanding is needed. You want to leave a little bit after each step. Once you get to the point where all the spots are gone you are very close to hitting glass and if you have’t got to the higher grits yet you may need to do an additional filler coat and start over.

I was not aware that Resin Research offered a UV epoxy resin.

I mean an epoxy that has uv protection.


The best advise i would give if you are not all redy is make sure you use top quality paper. I swich from cheap stuf i got at the diy store to rhynolox plus and it made such a hughe differance. yes it costs a little more but you save that in time alone probably 8x over it allso lasts 3 x as long and is a real plesure to use espesaly after crapy stuff. if i get a nice hot coat i can normaly start at 220  and go up to 400 for a nice mat finnish. i have been building a few 12’6 boards recently so can realy tell the diferance in the time it saves! i realy cant recomend it enuf i never thought there could be such a huge differance and wish i had learnt this from the start!. 

the other thing i did was on my chepo sander was to swap the wobley plastic loop handle for a side mounted one,  i found on a old sds drill handle (the ones that just get left in the box and forgoten about) all it tock was a bolt of the right size down the center and boom i had a solid handle and it is a lot more comfey and have more control. 


charlie

Thanks guys, your instructions really help me a lot and give confidence!

@trent

Resin Research isn’t available in Germany, you can only import it (e.g. from the UK) which leads to a ton of extra fees (hazardous stuff). But there are a lot of companies here who sell high quality epoxy resins (for boat building and such). I bought mine from hp-textiles, they also got many different cloths in stock. The topcoat resin I use is a bit UV - resistant plus I mixed it with thixotropic powder for lower viscosity and higher UV - resistance. Now I’m thinking if the low viscosity is also responsible for the unevenness… Any thoughts?

@charlieukusa

I bought sanding discs with velcro in packs of 10 for any grit size I need from a german manufacturer. A pack costs 5€ (6.75$) which is cheap I guess. I will certainly try out a quality brand product in the future!
My plastic loop handle doesn’t feel wobbly, but a site mounted one surely has a better handling. I need one.

Cheers,
Gordon

There’s a big part of yor problem!

Adding thixotropic powder (fumed silica) raises viscosity.  That makes it thicker!  Please take a look again at my first post.  I’m adding xylene to lower viscosity.

Hot coats are to fill the air pins in lamination coat. Hot coats just fill the weave of the lamination, anything more  is overkill. They are not used to flatten or fix shaping problems, or fix glassing issues.Hot coats do not add any strength to the surfboard, theyt adds weight, and need to be sanded down. Hot coat seal up the lamination.

Put some 80 grit on a sander and grind that lumpy wobble hot coat down till its flat. If you did a proper lamination, and preped your laps for the hot coat, the hot coat should resemble a gloss coat. Never add silica or what ever to a hot coat…thats just adding thickness to something that needs to be sanded off. Poly hot coats need a specific amount of hotcoat, too thick and it slabs off when you slam the door, too thin and the wax won’t rise and make it go rock hard. By adding the silica you made a thick layer of goop, that kicked off lumpy, wobbly, and jacked up…don’t do that again. Just use it as is…pour on the board. Lay it out rail to rail, walk it out nose to tail twice…Then walk away, just walk away…don’t fuss with it…just walk away. You should have the catalyst to kick at about 15 mins max, you should be done fussing with the hot coat in about 5-8 mins, this gives the resin 10 mins max to lay down and behave, but kick before air, bugs, dust, and gravity has time to sprinkle havoc. If its epoxy its even easier. Just spread it with a bondo spreader to just cover the weave pores, walk out nose to tail, and go have a beverage. Quit adding filler to your hot coats.

Thanks everysurfer for getting it right! I was aware that it raises viscosity (less fluent), I just confused it. It makes sense, that a tougher mass doesn’t provide a smooth surface. I added the thixotropic powder for extra UV-protection and didn’t think of the influence of viscosity!

With Xylene it’s the same like Resin Research, I can’t buy it in Germany. But the topcoat resin I have already has a low viscosity, I’ll just stop adding thixo powder to it.

@resinhead

Yeew, I will knock it down and get it nice and smooth! Thanks for giving good advice on what the hotcoat really is meant for (hope this makes sense in English). PS: Luckily I use epoxy, no poly fumes or wax!

i used to use the velcro discks as well but to sand a longboard i would use 1-2 discs per side per grit with rynolox i can get one hole board if not two from one pice for each grit. i actual use the old velcro disks to  stick it to so i can swap between grits quick as i only have two pads at the moment. I think i pay abount £15 for a pack of 50 sheets so cheaper than disks by the sound. I only use a 180mm disck so one sheet gives me one disck plus a nice bit for a hand block. If its ever posable to get excited about sand paper this is the clostet i have got haha