Sorry, I take the honor of the human jig meister. 5 minutes of work because of the picture taking. The pencil lines will come off with a very light scrub or sand.


Sorry, I take the honor of the human jig meister. 5 minutes of work because of the picture taking. The pencil lines will come off with a very light scrub or sand.
If I get it done like that I will be a very happy man! thank you for the walk through…
nice bb30 way to help out the man. i did something similar the first time i used futures
Very nice bb30.
I came across this futures install one pass router bit that would save a lot of problems. http://www.viral-surf.com/shaper/en/220-futures-one-pass-installation
I saw that too! but they are sold out and not available at the moment…
here come some follow up questions before I get going on this. and since I am still waiting on my resin I might as well accumulate all the necessary info I need…
So when I am done routing the slots for the boxes they will still stick up some, right? I mean the inner box that is raised up above the flange. When I start glassing, I put the football patches over it and then the glassing for the bottom. And only afterward do I grind the box down to level with the bottom? Won’t it bedifficult to lay the glass over the boxes without any air bubbles?
thanks again…
You are way ahead of yourself. What is your plan to secure and set you fin boxes in the foam???
If you are skilled glasser you can do it the way you descrtibed. I recommend
After fin boxes are secured and set in foam place the futures screw in the hole deep.
tape off top of box opening to include screw hole.
Cut you fiberglass box patches and set aside.
Spray tac your boxes only and let dry for 30 seconds or so.( Pic of spray templet will be posted later)
Carefully put patches on and finger to fiberglass securely to all the contours to the fin box(pic on page 1)
Put fast cure epoxy in small amounts to cover your patches and boxes. Your fin box portion of you board needs to be as level as possible to keep resin from running. Squeege the fiberglass to foam nicely
For striaght up foam boards(not like one pictured on page one) keep an eye out for bubbles and smush out if necessary. when it sets(not cured) glass the bottom of the board with your fiberglass and resin. You should have a worry free box section with your bottom lam. You can do the same exact thing with preglass leash plugs too.
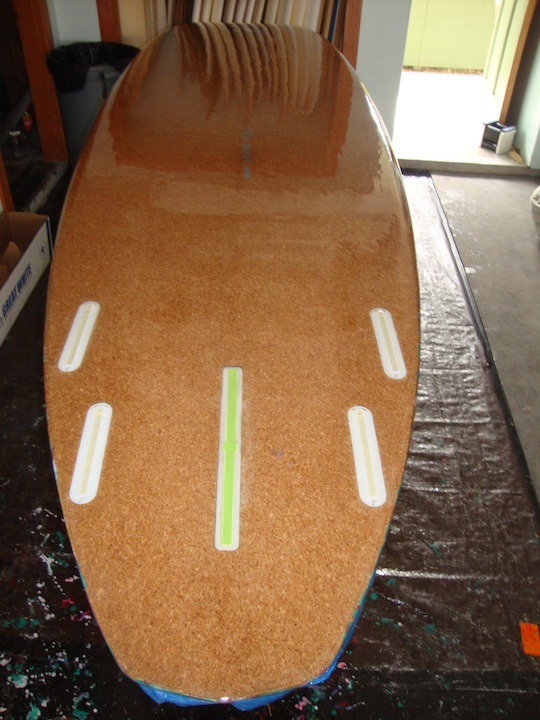
Here is the mock up example on the spay jig I use for the fiberglass patch on the boxes.
Please note…The box is taped off.
The reason I show this is because some spray adhesives eat foam so you need to protect your foam shape. You just need a second of touching the spray nozzle of to do the job.
Seabastian. I don’t know how to post pics to private messages.
Pic of fin box taped, patched, bottom lam, bottom filler coat, top lam, top filler coat. Will look something like this. notice how the top lam is over the boxes partially.
Use the same bit and router that made my box holes and take the cap off quickly and with no heat build up to the boxes
hit it with your low number grit sandpaper almost flush to deck, then sand your board to get it ready for last coat.
Tape off box holes one last time and put your final coat of epoxy on. Carefully remove the tape about 20 minutes after epoxy gets tacky.
Well, thanks to everyone on here I finally did it… I was very hesitant, but actually routed all boxes freehand, after doing like 20 practice runs on a piece of scrap foam! And all went well until I did the center fin on the stringer! even though I had a router with 6 different speeds and a router bit to rout wood, as soon as I dove in and started to drag the stringer burst and knocked me of my path! I the decided to punch holes all along the and the straighten them out backwards when done. I think the picture shows the result…


And then the chaos really started! laminating. I knew this was going to be difficult for a first timer but I didn’t know how bad…
First of all the silmar resin hardened away under my hands in what felt like no time! If it wasn’t for my little brother I wouldn’t have gotten the deck right. I used 1% MEKP the minimum dose recommended and yet I ran into problems…
I never got to saturate the rails properly and consequently didn’t warp them (I didn’t know what to do) and I think there is some air in the fin boxes. I need some help now to get this right, if that is still possible!?!? here some pics:


Please help me out with my next steps here…
And then the chaos really started! laminating. I knew this was going to be difficult for a first timer but I didn’t know how bad…
First of all the silmar resin hardened away under my hands in what felt like no time! If it wasn’t for my little brother I wouldn’t have gotten the deck right. I used 1% MEKP the minimum dose recommended and yet I ran into problems…
I never got to saturate the rails properly and consequently didn’t warp them (I didn’t know what to do) and I think there is some air in the fin boxes. I need some help now to get this right, if that is still possible!?!? here some pics:
Typically you’d lam the bottom first but you said “If it wasn’t for my little brother I wouldn’t have gotten the deck right” - does that mean the deck is laminated? Big difference in approach to repair if the deck is already laminated
Did you put patches over the boxes with the bottom lam? can’t tell from the pics
sorry! the deck is not glassed yet! what you see is obviously the bottom! and we didn’t get any further because I didn’t know what to do…
and yes, there are patches over the boxes.
Hi Sebastin-
Sorry it did not go well. I think you are going to need to carefully cut off the cloth that is not adhered correctly to the rail of the board. Maybe scribe a pencil line from the bottom of the board onto the rail and make a cut. Sand it smooth, and do a healthy rail wrap onto the bottom when you do the top.
The fin boxes don’t look so bad.
-J
PS Bud is offering better advice, more detailed including basting.
obviously, yes I recognize the bottom of a surfboard. what I couldn’t be sure is whether the deck was laminated, because you said the deck was done.
My .02 - Looks like you got it down at least part way onto the rails. I would use a razor and carefully cut away what ever cloth/resin that is not glued down against the foam, in a straight line as possible. Baste the edge/low spots with lam resin, let it cure then carefully sand with low grit or microplane flush leftover rough or high areas.
Laminate the double layer deck glass in two stages instead of together. cut the first layer edge to lay near the short lap from the bottom disaster. lightly rough sand or microplane any high spots again. cut the top layer with a bigger than normal lap onto the bottom. won’t be pretty and not as strong but should be fine for a first board.
Good luck HTH
Those are some classic “Oh shit, the resin’s goin off” shots.
That’s OK.
We’ve all been there.
Take a sanding block, with 80 grit or so,
Sand where the resin ends and the dry cloth starts.
Don’t sand through it though.
Just enough to bend and break off all the hanging stuff.
Sand some more lightly where the cloth ends and the foam starts.
Maybe lap both layers on the deck to make up for missing cloth from bottom lap.
Wide laps.
Now remember same temp, little more resin and two layers to saturate.
You’ll need more time.
Haul ass! Yes, it is a race.
Back off on the hardener.
Good luck.
alright. so this is not messed up beyond repair… I have some follow up questions though.
anything I need to do about the air bubbles around the boxes?
does it make sense to do the 2 deck layers separatly and wrap them both? just to add strength back?
do I sand the boxes flush before hotcoating?
thanks again for all the help.
sebastian
cbass,
No, it is not FUBAR.
F’d up beyond all recognition.
before you hot coat bottom, grind down boxes.
This will open up air bubbles around boxes
Tape off again.
Press tape really well.
Lap both layers at once.
You could do seperately though.