Surf/camper van build thread

Figured there might be interest in a build thread for a surf/stealth camper van. I’ve been thinking about this project for more than a couple years and the stars finally aligned to get a new car. I considered LOTS of options (Sportsmobile, Ford Transit, Transit Connect, Dodge Sprinter, Mercedes Sprinter, Nissan NV, Ram Promaster) and finally settled on a gas Ram Promaster 136 wheelbase, high top. If I were going to do a more “camper” conversion, I’d probably get the diesel 159 wheelbase, as it would simplify some of the build and give space for a kitchen.

My key requirements are to have boards completely inside the van, but have it still be a useable camp-able space with boards inside. It needs to be future proof (i.e., safe seating for future family expansion) and basic/simple, as it is also my daily driver. I wanted it to be fuel efficient (to the extent possible–this has been my only minor disappointment so far, I average 16-18mpg).

We wanted a very basic camper with these characteristics:

  • 2 person back seat with child seat latches and built-in 3 pt seatbelt
  • potable water and hot shower
  • full queen size bed
  • heater
  • inside but easily removable board storage
  • no kitchen or excess appliances (e.g., refrigerator, stove)--its a daily driver, so these seemed unnecessary

adventure van

I’ll start the build in the next installment–I bought the van in October and have been slowly making progress. Still looks like a construction zone, but I’ve gotten to a functional state. I’m willing to go slow on it, I want it to look and work well and NOT look cobbled together.

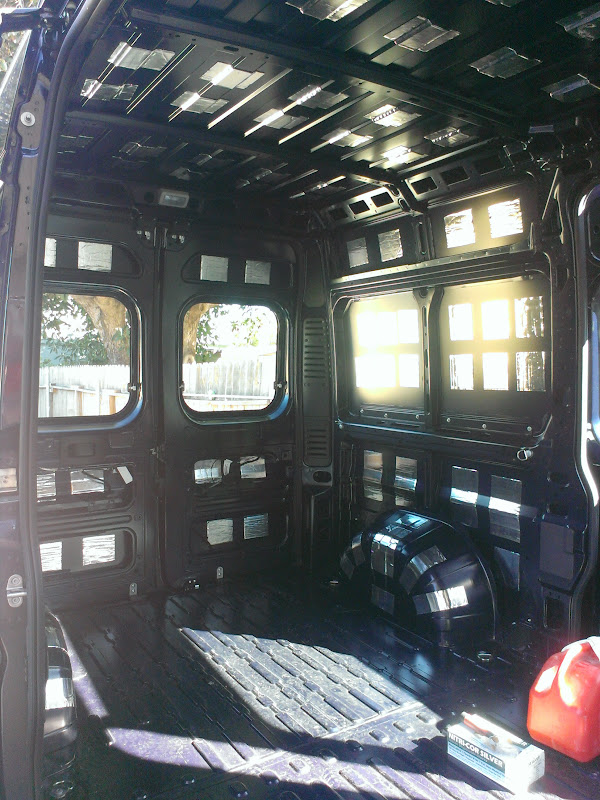
The van was EMPTY when I got it…no walls, no floor, no nothing. It was suprisingly not unreasonably loud on the highway, but I wanted to get it quieter. First step was to install sound dampener. I used CLD tiles from sounddeadenershowdown, seemed like the best bang for the buck.

Pre sound deadener:

Sound deadener applied:

I was amazed at how much just a bit of sound deadener helped with the road noise. I definitely feel it was worth the time and money.

The van came with untinted windows on both sliding doors and the back doors…but none open for ventilation. So my next priority was to install a vent and window that open, and more importantly, can be open in the rain, snow, etc without getting water in the van.

As you might imagine, I was more than a bit nervous to cut a big fucking hole in the side of my brand new van. I bought an rv/trailer window off ebay that is smaller than the maximum window size–I figured if I screwed it up too bad, I could always get a bigger window, just more money. 

First step is to take out the panel support:

Next, I layed out the cutout on the outside, with wide masking tape to keep the jigsaw from scratching up the paint.

The window is designed for a thicker wall (which is fine because I will be insulating and want a few inches of space between the sheetmetal and the wall. So I built a basic frame using 1x1 lumber and used construction adhesive to attach it to the sheet metal:

Then installed the window using butyl tape as the sealer and the trim ring to clamp it in. I tacked a few pieces of luan onto the frame before tightening the trim ring to account for the thickness of the wall that’ll be installed at a later date.

The gray on the edges is the excess butyl tape squeezing out. It continued to squeeze out for a couple weeks, I just scraped the excess off every couple days.

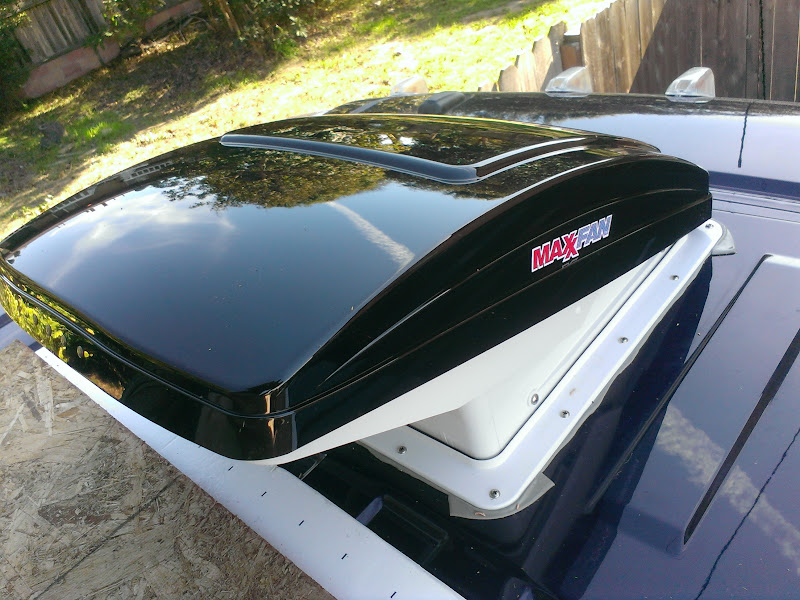
Next up was the roof vent. I chose a MaxxAir 12 speed fan–it has a built in thermostat that will open the vent when the inside reaches a set temperature and controls the fan speed, the fan turns off and closes when the temperature drops. The basic idea is the same as the window…cut a hole, put on a bit of primer on the cut edge, add a frame to get the wall thickness. The other key is that you have to climb on the roof–the roof isn’t robust to walking, so you need to be careful to not leave a bunch of dents. I put down some foam and then a piece of osb to spread the weight and keep away the dents.

Dicor (basically caulking) is a big mess, but you need to seal the screw heads to keep the water out. I splurged and went with Eternabond tape, which serves the same purpose, but should last longer and was much easier to apply.

Vent installed and in closed position:

The next installment will be the back seat!


 I have been thinking about a camper van. Been Looking at the New ford hi top Transit Van and also the Dodge Ram Like the one you have.  What kind of gas milage are you getting? The Spinter diesel seems to get 20-24 mpg I have heard that the Gas Ford Transit gets about the same with the Eco boost engine.   

Send Paul Jenson a message about your Project. He has done a few Sprinter vans. I’m sure you would have some thoughts and insights on your Project.  


Thanks Artz, Paul’s put up some build threads on his website and I’ve looked at them in detail. Good stuff.

I get about 15-16 in town, up to 20 on the highway, but lifetime average is about 17 or so. Other promasters seem to do a bit better…but maybe it is flatter and less windy than where I typically adventure? I’ve got a coworker with a 03 Sprinter (Diesel I5), he said he has never really gotten better than 20mpg, usually about 18-19. The modern Sprinter (all diesel) V6 is about the same, the new I4 gets low 20s. Supposedly the Promaster diesel I4 is also low to mid 20s…but they weren’t available when I was shopping for the van (and it seems the maintenance issues on modern diesels can very quickly add up to substantial costs/nightmares). I had originally planned on getting an old sprinter, but people wanted a crazy premium (like $15-20k) for 10 year old vehicles with 100k+ miles. The Transit is rated 14/19 with the ecoboost, they don’t have to rate the Promaster because it is only sold as a cargo van.

I’m pretty tall-6’2"–I didn’t find the Transit comfortable (and I can’t stand up straight inside), whereas the Promaster gives me a few inches of headroom, standing in the cargo area. But since it is front wheel drive, the van is actually shorter in height than the Transit, and the load height is less. The wheelbase length was also more compatible with my driveway.


Just in the process of building cabinets in a Mercedes Vito, so a fair bit smaller than yours.

Oh yeah, for you non US folks who have been blessed with all the cool cars (diesel compact trucks, 4x4 vans) we can’t get in the states, this guy is a rebadged Fiat Ducato, introduced to the US in 2014.

I bought an 04 high top Sprinter, 52,000 miles two years ago.  I’ll never get rid of it!  It’s the short one, 118" wheel base. Did the Sound deadening, insulation, new head linner.  Bench seat opens into double bed.  Kitchen with sink and hot shower!  It’ll hold 7-8 boards 10’6" long or on top of the passenger seat I can put my 12’ fish board.  I used Elephant Bark Flooring, excellent!  It’ll last forever.  Oh… average, city/highway, 25mpg on a 5 cylinder desiel!  My wife even LOVES driving it!  Turns on a dime!


Looks like the new sprinters will have a 4x4 option. Now I will have to win the lottery to buy one.  The other option is a pop up tent trailer,behind the Subaru.  
Keep posting photos

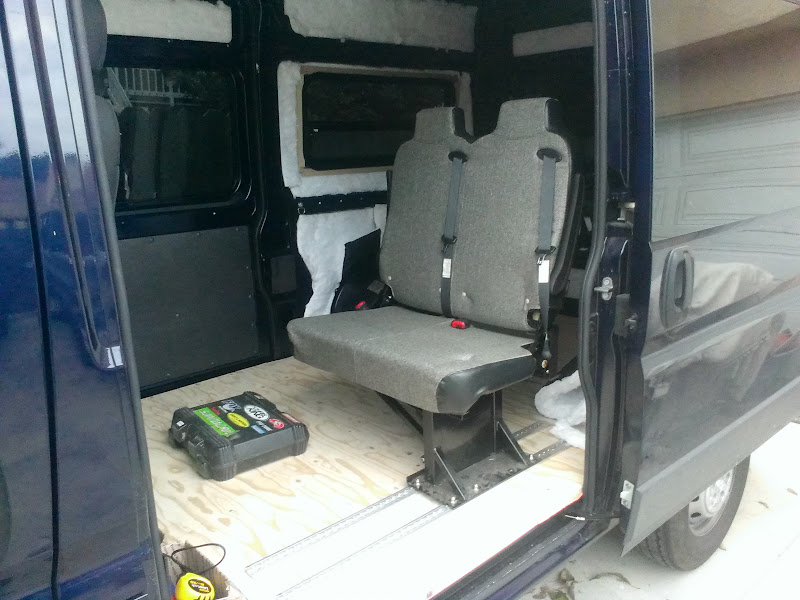
Debated the seat for a long time…actually before I even bought the van. The key requirements were integrated seat belts and baby seat latches. The original plan was to get a 2 person seat from an early model Sprinter (they switched to 3/4 person seats in the later models), but after a couple months of looking, I couldn’t find any. The newer seats are bigger than I wanted, so they were a no go. I finally found a company (Freeman Seating) that manufactures seats for buses and trains. They had a cool model that had all the components I was looking for, but also folds up flat against the wall. It ended up being more than I wanted to spend, but we decided this was a place to buy once, cry once. They custom make the seat for you, and so we were able to match the front seats fairly well.

The seat in its folded up position, mock up to figure out where to put it:

Even though the seat folds up and takes minimal space, I also wanted to be able to remove it easily if necessary. I’ll do the install pics next post.

Swaylocks ate my last post, here goes again.

I wanted to be able to remove the seat easily and adjust its location–we don’t have kids yet and have plans for a big road trip before it happens (so it might be nice to pull anything extraneous to maximize living room). Many disability vans have seats installed on L-track and I like the way it works and can be used to secure other gear in the van, plus the added load distribution of the track seems to be a good idea. 

First, I installed 19/32 t+g subfloor with a 3in1 underlayment underneath to keep it quiet and hopefully give a moisture barrier between the subfloor and the van. I used butcher paper to make templates for each piece.

In areas where the track goes, I also filled in the depressions in the floor with thin plywood.

The track is drilled every 4 inches for grade 8 1/4-20 bolts (100" of track total, 24 bolts). I had to shift a few of the bolts to miss inaccessable areas under the van, but more or less kept the spacing where possible. I made 6"x 3/16" steel flat plate brackets to distribute the load and tie into the unibody welded area (the van doesn’t have a traditional frame, all the sheetmetal is welded together to make the structure).

Bracket installed:

Here is the seat installed–I used 6 of the heavy duty L-track seat bolts to hold the seat down.

I’m pretty happy with how it came out. The folding mechanism is very sturdy and it doesn’t rattle when folded up. I wish the seat back was a little less vertical, but I doubt I’ll be sitting back there much. Eventually, there will be wood floor flush with the flanged L-track, right now it sits proud. But the floor is last on the agenda.

I wanted to post this separate so it doesn’t get lost.

I didn’t really take any pictures of insulating the van (but it was an early project). After lots of research and hemming and hawing, I decided to go with Thinsulate acoustic insulation rather than any of the box store insulation (fiberglass, rock wool, denim) because it is hydrophobic, mildew resistant, and it was designed for use in cars/boats. It is also substantially more expensive and perhaps not as insulating, but for the typical temperatures (15-100F) that we will camp in, it is sufficient. Partially to hold it in place, but also to add a bit more insulation, I also used Reflectix from the box stores. You’ll see pictures of insulation in later installments.

Building out vans is like building surfboards, early attention to the details pays off huge, in use… You are really doing a thoughtful build…

The website www.expeditionportal is considered thee source for projects like this… You should mirror post this thread there…

I would have started with a light colored van, unless you are looking for it to be a heat source… It sort of defeats some of the insulation that you are paying a premium for… Other than that, I love what you are doing…!!!..

i am in the final week of a four month long renovation of a Mitubishi Fuso 4x4 cube-box expedition camper… It has already been to forty countries, and lived in for two years continuously… I did a near total strip out and rebuilt it to be a craftsman style cabin… Cedar and walnut trim, stainless steel countertop, cork floor, and a shower with wall panels identical to my surfboard skins…  Here is that build thread : http://www.expeditionportal.com/forum/threads/137838-2003-Mitsubushi-FG-Overland-Camper-Renovation


Thanks Paul…I’ve easily spent 5x thinking about and planning the project vs actually doing! 

I agree, the dark blue was not the ideal color–but the price was right and it had a couple features (sliding doors on both sides, power retracting mirrors, adjustable seats) that outweighed the color. I was hoping for a silver or tan one. If money were no object, I would have ordered exactly what I wanted…but figured it was worth using that money on the build instead.

The Fuso 4x4 was on the list of dream rigs (along with a mercedes 1017 or an Iveco)…but I have to be realistic, I don’t get to go offroading much anymore and it would kill me as a daily driver!

Keep following, I just finished the backdoor sink/shower with wood surfboard skins, I suspect you’ll appreciate it!

Great to see a thread like that and great work on that van too!

Sweet build!

Looks like you’re doing it right!

I have mind built a few of these and am envious of you project…

I am of the opinion though that the gas mileage guideline is kinda silly. I used to be a  big fan of the Sprinter vans with their 25 ish MPG. But, here’s the thing, you pay up front vs paying later for gas…

An older domestic work van (Econoline, RamVan, Vandura) can be picked up in good shape for under $2000. Parts are EVERYWHERE. EASY to work on. Built right. And they get about 10-15 MPG… The 5k - 20k that one might pay for a “nicer” van plus the maintenance and difficulty in finding parts, etc just doesn’t add up to me. But, that’s just me.

I agree, ChrisP, it is a false economy to think the gas mileage is going to pay for itself (unless you are putting on truck driver mileage, which I’m not)–but if you are already going to pay more for a vehicle, you don’t want to get reamed on fuel on top of that.

The domestic work van vs Sprinter/Euro-style van is kinda an oranges vs tangerines comparison. You can’t stand up in a domestic van unless you are really short (or get a pop top, which isn’t so stealth)! They drive poorly (in my experience) and turn like a tanker. And you can’t ignore the panel van creeper factor :wink: If you don’t have person-carrying requirements, bread trucks and box trucks can also be made into great surf vehicles for little money. 

Horses for courses…make your checklist of what you want out of a vehicle and go from there! If I were hitting Baja more regularly, I’d have probably gotten something 4wd…

I have done a fair amount of exploring in Baja with a 4x4.  I am always amazed when I get through driving a rough road for miles, pull up to a break, and see a VW bus already parked there.

Having the engine over the drive wheels, airing down your tires, and not having a heavy throtle foot will get you far in sand etc.

Ok, next installment. I wanted lighting that was comfortable to read by, dimmable, and fills the whole interior space. LED strips seemed like the way to go…I think 16’ of daylight white 5050 draws <3A, so really low power draw. I also wanted the lighting to seamlessly fit into the walls and ceiling. I found some flanged aluminum LED extrusion with a translucent white cover that can fit 2 strips and came in 2m long pieces (I’ve got a bunch extra I’d sell at cost if anyone needs some) that will act to help hold up the ceiling panels and act as trim.

First I installed some 3" wide 1/8 thick 6061 aluminum strap in three rows across the ceiling–the strap is used to give the LED extrusion some strength in the unsupported areas between the ceiling crossbeams. I used countersunk rivets to attach the LED extrusion to the strap and sheetmetal screws to hold the strap to the ceiling. As I was putting up the strips, I also put in place the unfinished ceiling panels to space the flanges right.

Reflectix and thinsulate insulation under the strips. The LED strips are on double stick tape (not installed in the below pictures). I’d highly recommend doing any soldering BEFORE you stick it in place (overhead soldering is not too fun).

I used wireless WiFi LED dimmers off Amazon (the remote + 4 dimmers was about $40)–you can control all the light circuits together, separately, and dim each separately. Since it uses WiFi, the remote works from anywhere in the car and outside as well.

On the outer strips, I used 1 strip of white and 1 strip of red (total of 20 ft of white, 16 ft of red), the center strip has 2 strips of white, about 8 ft. I wired three circuits: two outer white strips, center white strip, two outer red strips. The idea behind the red (besides getting to sing the Police all the time) light is that if someone needs to go in the back while we are driving, I don’t get blinded. Also rad for camping and stargazing, so you don’t lose your night vision. I wouldn’t read by the red, but you could, it is pretty darn bright. My wife teased me about the red, but she has ended up really liking it.

Really stoked on the lighting…cheap, bright, and very flexible (dimmable).

Hi,

Really interested in your project.

Red led strips are a damn good idea, we use them a lot for night sailing as u saif top reserve the night vision.

What LED power do u have  (W ?), are they directly connected to the car battery or do u have a dedicated one ?

Do u plan to put some curtains on the window to avoid the “red light district” mode when using red LEDs ?

Sry for all the questions ^^.

Z.